Workshop 02: Git Introduction
- Introduction
- Step 00: How to Use the Terminal
- Step 01: Get the Workshop Repository
- Step 02: Clone the Repository
- Step 03: Commit an Edited File
- Step 04: Push Changes to GitHub
- Step 05: Add a File to the Repository
- Step 06: Move a File
- Step 07: Pull Down Changes
- Step 08: Handle a Conflict
- Step 09: Destruct Your Repository (and bring it back…)
- Step 10: Destructively Delete a File Using Rebase
- Step 11: Revert changes
- Step 12: Add your screenshots to the repository
- Submitting your assignment, and other reading
Introduction
Version control systems (VCS) are an essential component of any software project. A VCS provides you with many benefits, including:
- Time-travel to previous versions: When it is three minutes to the deadline on an important project and you have broken everything, version control lets you time travel (or revert) your code back to a previous (and, hopefully, working!) version.
- Collaboration: Multiple people can collaborate on a single project using version control. The VCS will prevent you from accidentally writing over others’ changes.
- Backup: Your VCS is typically hosted on a server somewhere, which means that if your computer dies, your code lives on elsewhere.
- Metrics: Since your VCS logs all of your code changes, you can look at its log to see how productive you/your team is. We will be using these metrics ourselves to ensure that everyone is contributing to team projects.
In this workshop, you will learn how to use the version control system Git effectively in a group setting. While Git has many commands and features, this workshop will only cover the few core Git commands that developers actually use on a regular basis.
Let’s get started!
Small note: you may notice that some of these images refer to Workshop 1. It is really Workshop 2. We renamed it at the last minute and haven’t had a chance to fix everyone once we noticed the mistake.
Step 00: How to Use the Terminal
You are going to use the terminal regularly in this workshop, as well as future workshops. We assume that you are familiar with the terminal. If you are not, please familiarize yourself with the terminal by following one of the tutorials posted for this week’s reading.
You will need to know:
- How to run commands in the terminal.
- How to determine what directory you are currently in.
- How to change directories.
- How to view a list of files in a directory.
In the workshop, shell commands will begin with a $ prompt. Output does not
have this prefix. For example, we would print the ls command along with its
output like so:
$ ls
README.md	password.txt
This should disambiguate what we’re telling you to run as commands from the command output.
Step 01: Get the Workshop Repository
Every project you work on in this course will be contained within a single Git repository. Each repository has its own set of files and folders, and tracks changes to those files and folders. Typically, companies and organizations use a single Git repository for each software project.
In this class, we use GitHub to host the Git repositories for us, and GitHub Classroom to manage all assignment repositories. For each workshop, we will provide you with an existing Git repository that you will use for that workshop.
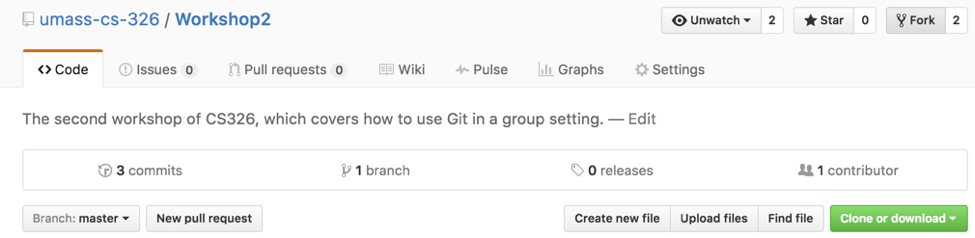
To get started you need to fork the GitHub repository for Workshop 2. To do that click on the “Fork” button, it is on the upper right-hand part of the github page next to “Unwatch” and “Star”:
After you click on the “Fork” button you will be asked “Where should we fork this repository”:

You should click on the location that matches your GitHub username. After you do so you will need to wait for GitHub to fork this repository to your own GitHub user account. You will see something like this:

After a few seconds, it will show you the same repository that now resides under your own GitHub user account. You essentially copied it to your own account and can now proceed to work on it by following the instructions in the rest of this workshop. This repository should be public. It is fine if others who are doing the same workshop can see your work - the commits you will do below ensure that you do your own work.
GitHub creates an Issue Tracker and a Wiki for each Git repository, and provides neat data analytics under Pulse and Graph. We will not cover these items now, but feel free to check them out in your spare time!
Step 02: Clone the Repository
Open up a terminal on your computer, and use cd to navigate to your class
folder. We are going to use Git now.
Reminder: If you are using Windows, you should use the “Node.js Command Prompt” as your terminal.
The git clone command tells git to create a copy of a remote repository.
It will create a copy of your Workshop 2 repository from GitHub on your local machine. In your terminal, type this in your terminal:
$ git clone https://github.com/GITHUB-USERNAME/Workshop2.git
You will need to replace GITHUB-USERNAME with your GitHub username. You may also be asked to enter your GitHub username and password:
$ git clone https://github.com/GITHUB-USERNAME/Workshop2.git
Cloning into 'Workshop2'...
remote: Counting objects: 6, done.
remote: Compressing objects: 100% (4/4), done.
remote: Total 6 (delta 0), reused 6 (delta 0), pack-reused 0
Unpacking objects: 100% (6/6), done.
Checking connectivity... done.
The clone command will create a new folder called Workshop2 in the current folder. Use cd to change the current directory to that folder:
$ cd Workshop2/
$ ls
README.md	password.txt
(Note: Windows users will need to type dir for a folder listing, not ls.)
Any git commands performed while inside this folder will be applied to the
repository clone in this folder.
Step 03: Commit an Edited File
Open up the repository folder in Atom Editor, select README.md, change the
text inside, and save your changes.
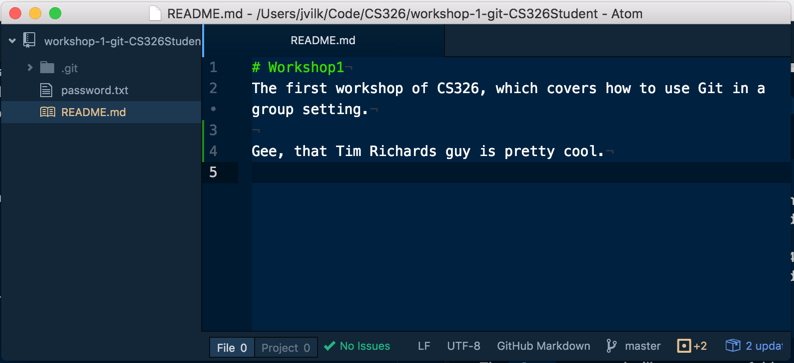
(We won’t award any extra credit for nice comments, even if they are true.)
Now, we need to tell Git to record this change! Git records changes as commits. Each commit contains edits to one or more files. Git can time-travel, or revert, your repository back to any commit in your repository’s history. (We will cover this in a bit.)
In a professional environment, companies usually request that each commit corresponds to a particular bug fix, feature request, or enhancement, and that no commit breaks previously-working functionality. We will not enforce any particular commit conventions on students, but we encourage you to commit early and often on your projects – and to make sure you have a working version of your project committed before you embark on a crazy code change!
In any case, to commit this change, use the command git commit -a. The -a
flag is shorthand for “include all changed files in this commit”. Without -a,
you would have to tell Git which files to include in the commit – e.g.
git commit README.md.
Git will pop open the Atom Editor, requesting that you add a commit message. All of your commit messages are included in your repository, so don’t type anything you’d regret.
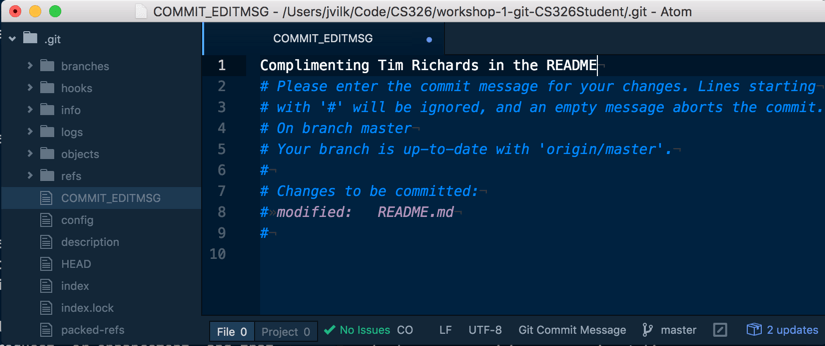
When you have finished typing a commit message, save the file, and close Atom. Back on the command line, Git will report that your commit succeeded:
$ git commit -a
[master 82fb093] Complimenting Tim Richards in the README
 1 file changed, 2 insertions(+)
Every commit has a hash that is associated with it. This commit’s hash begins
with 82fb093. You can use these hashes to travel back in time to previous
versions of your software, which we’ll review a little later on in this
workshop.
You can see this commit message, and its full hash, at the top of the git log:
$ git log
commit 82fb0939eff681d5aaece429227def4dc9e464d5
Author: John Vilk <[email protected]>
Date:   Tue Dec 29 16:35:25 2015 -0500

    Complimenting Tim Richards in the README
Step 04: Push Changes to GitHub
If you look at your repository at GitHub.com, you’ll notice that README.md
doesn’t contain your changes!

That’s the old README! What gives?
git commit adds your file changes to the local repository clone located in the
workshop-1-git folder; it does not send those changes to the remote
repository located at GitHub.com. As it turns out, git clone creates a copy
of the entire Git repository, including all previous file changes. Git hides
this data from you in the .git subdirectory of your workshop-1-git folder
(which you should never mess with):
$ cd .git
$ ls
COMMIT_EDITMSG	config		index		objects
HEAD		description	info		packed-refs
branches	hooks		logs		refs
$ cd ..
To send your local commits to the remote repository hosted on GitHub, use
git push. If you did not enable the credential cache, Git will ask for your username and password.
$ git push
Counting objects: 3, done.
Delta compression using up to 4 threads.
Compressing objects: 100% (3/3), done.
Writing objects: 100% (3/3), 420 bytes | 0 bytes/s, done.
Total 3 (delta 0), reused 0 (delta 0)
To https://github.com/umass-cs-326/workshop-1-git-CS326Student.git
   9e1bd06..82fb093  master -> master
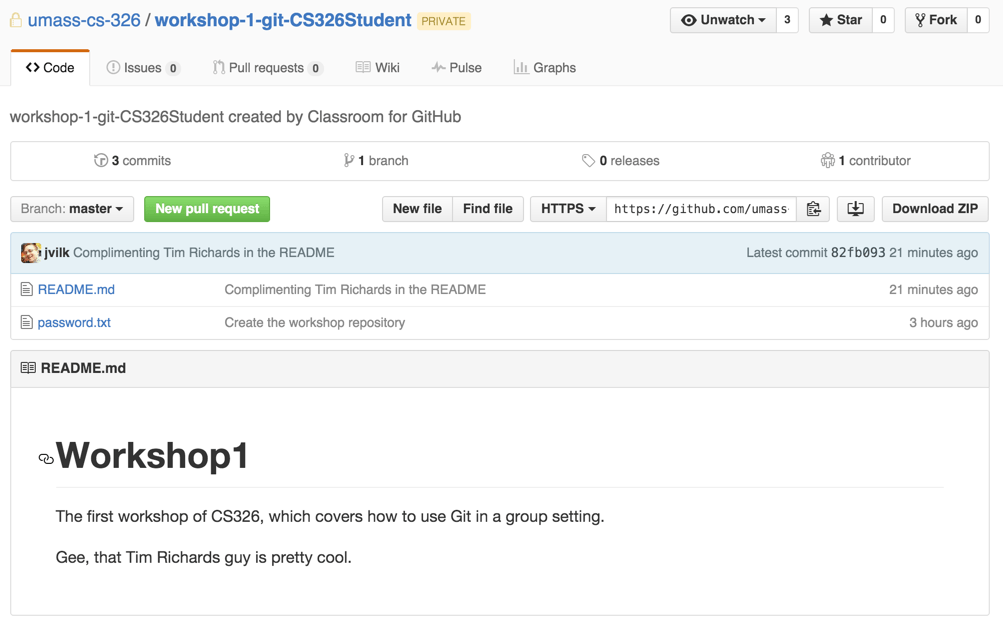
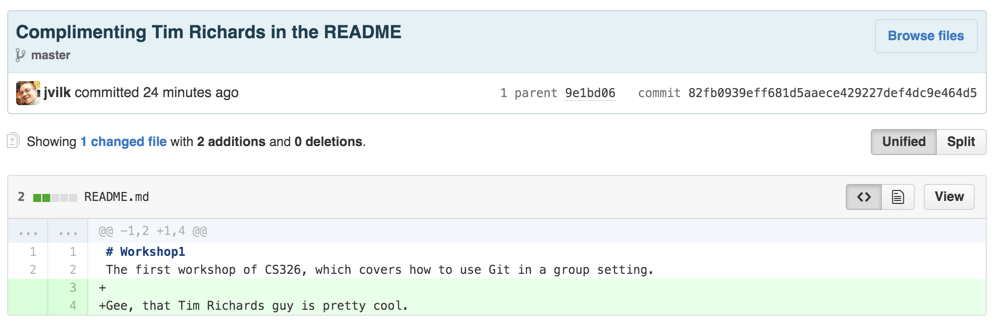
Now, your README changes are visible on GitHub.com:
If you click on the 3 commits text above the file listing, GitHub will show you a neat listing of repository commits:
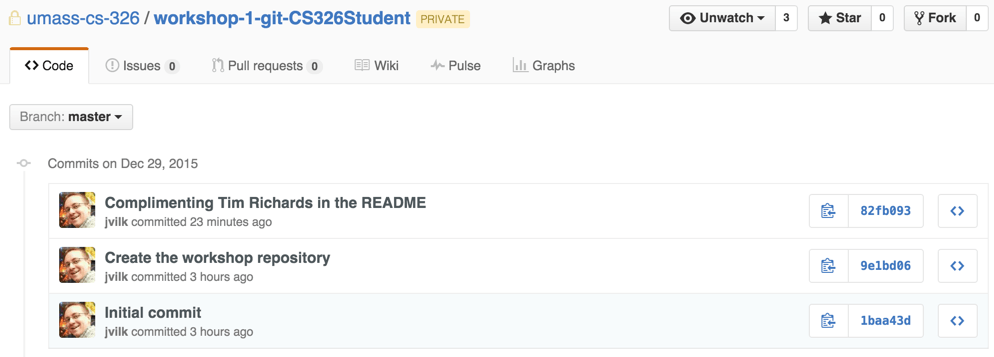
Clicking on each will show a diff of the changes you made:
In general, you should always push your changes immediately after you commit
them, especially on group projects!
Step 05: Add a File to the Repository
Let’s add a new file to the repository. Create a new file called data.txt,
and put some text into it. (In the Atom Editor, you can create new files by
right clicking on the left file listing, and clicking “New File”.)

If you run git commit -a, Git will tell you that nothing has changed…
and that data.txt is an untracked file:
$ git commit -a
On branch master
Your branch is up-to-date with 'origin/master'.
Untracked files:
	data.txt

nothing added to commit but untracked files present
We need to explicitly tell Git to track changes to our new file. To do this, run
git add data.txt. Forgetting to tell Git about new files is an easy mistake
to make! Always check that your files are added, committed, and pushed to
GitHub.com.
Now, we need to tell Git to commit our changes to the now-tracked file.
Run git commit -a to actually commit the new file, then run git push to send
the changes off to GitHub. You should see the new commit at GitHub.com:

Step 06: Move a File
I don’t like the filename data.txt. Let’s name it data.dat, instead.
While we could simply rename the file the usual way, git would see data.dat as
a new, untracked file, and would think that you deleted data.txt. That’s
confusing. Thankfully, there is an easier way!
Simply run git mv data.txt data.dat, and all is well. This command does two
things:
- Renames the file.
- Tells Git about the rename.
Now, use git commit -a and git push, and the changes will be visible on
GitHub.com.
Remember: Whenever you change a file’s name, you need to tell git about it. If you don’t, git will think you deleted the file.
Step 07: Pull Down Changes
So far, we have covered simple commands for the scenario where you are pushing changes to GitHub from a single local repository clone. But what happens when you are working in a team? How do you grab changes that others have pushed to GitHub?
To answer this question, return to your class folder and make a second local
repository clone of your Workshop 2 repository. This time, tell the git clone
command to clone the repository into the folder workshop2-second-clone:
$ git clone https://github.com/GITHUB-USERNAME/Workshop2.git Workshop2-second-clone
Cloning into 'Workshop2-second-clone'...
remote: Counting objects: 14, done.
remote: Compressing objects: 100% (11/11), done.
remote: Total 14 (delta 2), reused 13 (delta 1), pack-reused 0
Unpacking objects: 100% (14/14), done.
Checking connectivity... done.
$ cd Workshop2-second-clone/
$ ls
README.md	data.dat	password.txt
In this second clone, add more text to README.md, commit the changes, and push
the changes to GitHub.
Return to your first clone, and type git pull. This will download the changes
you pushed to GitHub from your second clone to your computer, and apply it to
your first clone:
$ git pull
remote: Counting objects: 3, done.
remote: Compressing objects: 100% (2/2), done.
remote: Total 3 (delta 1), reused 3 (delta 1), pack-reused 0
Unpacking objects: 100% (3/3), done.
From https://github.com/GITHUB-USERNAME/Workshop2.git
   4c8bad6..1a58830  master     -> origin/master
Updating 4c8bad6..1a58830
Fast-forward
 README.md | 3 +++
 1 file changed, 3 insertions(+)
Take a screenshot of your terminal output
from git pull, and include it in your Workshop 2 submission.
Note: If Git reports that your repository is “Already up-to-date”, you either:
- Forgot to commit and push your edit in the second clone, or…
- Are trying to run
git pullin the second clone, and not the first clone.
It is a good idea to run git pull regularly when working in groups to keep
your local repository clone in-sync with GitHub’s copy. If you don’t… you’ll
likely have many issues with merge conflicts.
Step 08: Handle a Conflict
When you use Git in a team setting, you are going to encounter a merge conflict. Merge conflicts occur when you try to push local changes to GitHub that conflict with changes other people have already pushed to GitHub. We’ll illustrate merge conflicts by having you create one using your two local clones of Workshop 2.
In your first clone of Workshop 1, edit the first line of README.md to say
Workshop 2: Git instead of Workshop2. Then, type git diff for fun, and
git will show you all of the changes you’ve made that you haven’t committed
yet:
$ git diff
diff --git a/README.md b/README.md
index 770692b..46fd672 100644
--- a/README.md
+++ b/README.md
@@ -1,4 +1,4 @@
-# Workshop1
+# Workshop 1: Git
 The first workshop of CS326, which covers how to use Git in a group setting.
It’s often useful to review your code changes with git diff before you commit
them. Sometimes, you’ll notice that you forgot to remove a debug line, or that
you have other changes that shouldn’t be included in the commit.
Note: For large changes that fill the terminal, git diff is interactive. When this happens, use the arrow keys to scroll up and down, and hit q to quit when done.
Commit the change with git commit -a, and git push the change to GitHub.
$ git commit -a
[master 36f4ca6] Fixing the title of the README.
 1 file changed, 1 insertion(+), 1 deletion(-)
$ git push
Counting objects: 3, done.
Delta compression using up to 4 threads.
Compressing objects: 100% (3/3), done.
Writing objects: 100% (3/3), 380 bytes | 0 bytes/s, done.
Total 3 (delta 1), reused 0 (delta 0)
To https://github.com/GITHUB-USERNAME/Workshop2.git
   1a58830..36f4ca6  master -> master
Now, navigate to your second clone of the Workshop 2 repository.
In the second clone, do not pull down your change. Instead, edit the first
line of README.md to say Workshop-2. (Note that this is different from the
first edit we made.) Commit the change with git commit -a, and try to
git push the change to GitHub. It will fail!
$ git push
To https://github.com/GITHUB-USERNAME/Workshop2.git
 ! [rejected]        master -> master (fetch first)
error: failed to push some refs to 'https://github.com/GITHUB-USERNAME/Workshop2.git
hint: Updates were rejected because the remote contains work that you do
hint: not have locally. This is usually caused by another repository pushing
hint: to the same ref. You may want to first integrate the remote changes
hint: (e.g., 'git pull ...') before pushing again.
hint: See the 'Note about fast-forwards' in 'git push --help' for details.
Git’s error messages can be very confusing if you don’t have a PhD in Git
Internals (fetch first? fast-forwards?! refs?!?!?), but the important bit is the
hint. GitHub has some changes that your local clone doesn’t have.
Run git pull to grab these changes, and Git will report that there is a
conflict:
$ git pull
remote: Counting objects: 3, done.
remote: Compressing objects: 100% (2/2), done.
remote: Total 3 (delta 1), reused 3 (delta 1), pack-reused 0
Unpacking objects: 100% (3/3), done.
From https://github.com/GITHUB-USERNAME/Workshop2
   1a58830..36f4ca6  master     -> origin/master
Auto-merging README.md
CONFLICT (content): Merge conflict in README.md
Automatic merge failed; fix conflicts and then commit the result.
Git tries its best to automatically merge changes. If you and a team member edit different lines in a file, Git will simply merge both edits to the file. However, if multiple people edit the same line of a file, the merge fails; this is called a merge conflict. Git requests that you figure out the merge yourself.
Open up README.md, and you’ll see that Git has helpfully told you where the
conflicting changes are:
<<<<<<< HEAD
# Workshop-2
=======
# Workshop 2: Git
>>>>>>> 36f4ca627ea17f02450c5f6ded877dafb2d86d43
The first workshop of CS326, which covers how to use Git in a group setting.

It's pretty useful.

Gee, that Tim Richards guy is pretty cool.
Git refers to the latest commit in your local clone as HEAD. The text between
<<<<<<< HEAD and ======= corresponds to changes in your local repository.
36f4ca... (which will be different for your
repository) is the commit hash of the commit that conflicts with your change.
This is the commit that we made from the first local clone. The text between
======= and >>>>>>> 36f4ca... contains the text from that commit that
conflicts with your local change.
To solve the conflict, replace the <<<<< >>>>> nonsense with the
text you want. In most conflicts, you will simply choose one change over the
other. Sometimes, you will figure out how to incorporate both changes. It all
depends on the context.
Here, though, one title is better/more specific than the other; edit
README.md so it looks like the following:
# Workshop 2: Git
The first workshop of CS326, which covers how to use Git in a group setting.

It's pretty useful.

Gee, that Tim Richards guy is pretty cool.
Now, run git commit -a to commit your merge. Git will automatically fill in
a commit message for you, which mentions that it is a merge. Then, git push
the commit to GitHub.
$ git commit -a
[master df7395f] Merge branch 'master' of https://github.com/GITHUB-USERNAME/Workshop2
$ git push
Counting objects: 4, done.
Delta compression using up to 4 threads.
Compressing objects: 100% (4/4), done.
Writing objects: 100% (4/4), 605 bytes | 0 bytes/s, done.
Total 4 (delta 1), reused 0 (delta 0)
To https://github.com/GITHUB-USERNAME/Workshop2
   36f4ca6..df7395f  master -> master
Step 09: Destruct Your Repository (and bring it back…)
You should treat Git as a write-only resource; everything that you put into Git stays in Git, forever. If you simply delete a file from Git and commit that change, Git will still contain the old version of the file in its history.
If you Google around, you might find some Git commands that let you rewrite Git’s history. These are called destructive Git commands, since they cannot be undone. These are dangerous and potentially lethal to your data.
To illustrate the danger of these commands, we will show you how to completely obliterate your repository. Then, we will bring it back from a backup. Let’s begin.
Use git pull on both local repository clones to make them up-to-date.
We’re going to use the first clone to destroy GitHub’s copy of the repository.
Then, we will restore the repository from the second clone.
Thus, it is essential that both of your local clones are up-to-date.
In your first repository clone, run the following command to reset the repository to the first commit. The hash value at the end of the command is the commit hash of the first commit in the repository, which is the same across all Workshop 1 Git repositories.
$ git reset --hard 1baa43d0656d4095d3e0c44b2b1aea43e9c9b288
HEAD is now at 1baa43d Initial commit
Now, try to git push. Notice that Git will prevent the push, since GitHub has
changes that your Git repository no longer has:
$ git push
To https://github.com/GITHUB-USERNAME/Workshop2.git
 ! [rejected]        master -> master (non-fast-forward)
error: failed to push some refs to 'https://github.com/GITHUB-USERNAME/Workshop2.git'
hint: Updates were rejected because the tip of your current branch is behind
hint: its remote counterpart. Integrate the remote changes (e.g.
hint: 'git pull ...') before pushing again.
hint: See the 'Note about fast-forwards' in 'git push --help' for details.
But we can force this change! Run git push -f, and your destructive change
will go through as a forced update:
$ git push -f
Total 0 (delta 0), reused 0 (delta 0)
To https://github.com/GITHUB-USERNAME/Workshop2.git
 + df7395f...1baa43d master -> master (forced update)
Now, go take a look at your repository on GitHub. All of your commits are gone.
Take a screenshot of your empty repository on GitHub; you will include it in your submission.
Take a moment to imagine
that it’s 4AM, you typed in some random Git commands you saw on the internet,
applied them to your group project repository, and now your entire GitHub
repository is gone. If your team members run git pull, their local repository
clones will be overwritten. Your project, and its code, will disappear forever.
Fear not, though! You can restore your repository from your second clone.
Return to your second clone, and run git push:
$ git push
Counting objects: 21, done.
Delta compression using up to 4 threads.
Compressing objects: 100% (20/20), done.
Writing objects: 100% (21/21), 2.47 KiB | 0 bytes/s, done.
Total 21 (delta 4), reused 0 (delta 0)
To https://github.com/GITHUB-USERNAME/Workshop2.git
   1baa43d..df7395f  master -> master
Note: This push succeeds without a -f because it only contains commits directly after the first commit. Nothing is being destroyed, so GitHub happily accepts the push.
Then, go to your first clone, and git pull down the changes you just pushed.
Finally, go to GitHub, and verify that your repository is back to normal.
Step 10: Destructively Delete a File Using Rebase
Let’s use a destructive update for good. You may have noticed that theres
a file called password.txt in the repository that contains a username and
password for jvilk! Egads! This should not be in the repository, and should be
wiped from git’s history.
First, run git pull on each of your local clones to make sure each is
up-to-date. We want to have a backup in case the destructive update runs
afoul!
Now, we are going to use the git rebase command. This command lets you go
back in time and change history. It’s quite powerful.
If you look at your commit listing on GitHub, you’ll notice that password.txt
was added in the following commit:
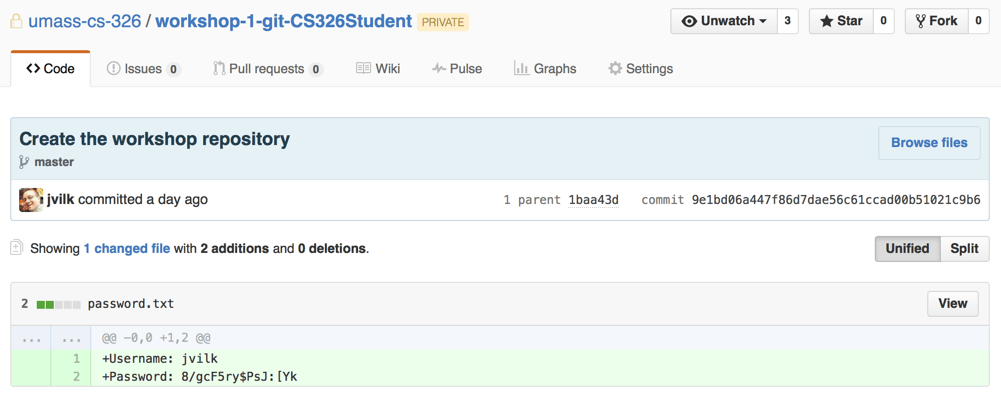
9e1bd06a447f86d7dae56c61ccad00b51021c9b6 is the hash of this commit. We can
tell Git that we want to edit history starting at this commit using the
following command:
$ git rebase --preserve-merges -i 9e1bd06a447f86d7dae56c61ccad00b51021c9b6~1
-i means interactive. Git will open the Atom Editor asking you how you
would like to proceed. --preserve-merges tells Git to re-use merge commits,
like the one we created in the merge conflicts step. (Why is this not the
default behavior? Good question. :) )
9e1bd06a447f86d7dae56c61ccad00b51021c9b6~1 means ‘rebase all commits after the
commit that precedes commit 9e1bd06… by 1’. Confusing? Now you know why these
destructive commands can be easy to get wrong!
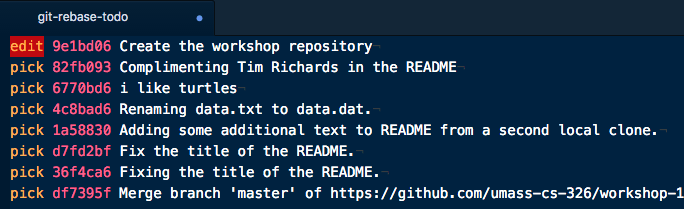
Git will open the Atom Editor with a listing of commits and a verb applied to
each. The verbs are explained in comments at the end of the file. By default,
Git will pick every commit, which re-applies the commit as-is.
We need to change the commit that added the password. Tell Git that we want to
edit the commit 9e1bd06:
Save the file, and close Atom Editor. You’ll see the following in your terminal:
$ git rebase --preserve-merges -i 9e1bd06a447f86d7dae56c61ccad00b51021c9b6~1
Stopped at 9e1bd06a447f86d7dae56c61ccad00b51021c9b6... Create the workshop repository
You can amend the commit now, with

	git commit --amend

Once you are satisfied with your changes, run

	git rebase --continue
Git has now traveled back to when we first accidentally committed
password.txt. Excellent. Let’s delete the password from this commit,
preventing it from being added to Git in the first place:
$ git rm password.txt
rm 'password.txt'
Now, we need to tell Git to replace the password commit with our new, modified
commit. git commit --amend lets you replace the latest commit (called HEAD,
which we discussed in the merge conflict step) with a new commit. Since we
have traveled back in time, HEAD currently points to 9e1bd06..., which is
the commit that contains the password.
To be super lazy, we can also specify -C HEAD, which lets us reuse the commit
message and author information from the password commit. Run this command now:
$ git commit --amend -C HEAD
rebase in progress; onto 1baa43d
You are currently editing a commit while rebasing branch 'master' on '1baa43d'.

Untracked files:
	password.txt

No changes
You asked to amend the most recent commit, but doing so would make
it empty. You can repeat your command with --allow-empty, or you can
remove the commit entirely with "git reset HEAD^"
Since commit 9e1bd06 only contained password.txt, Git complains that
removing password.txt causes that commit to be empty. While we could re-do
the rebase and remove the commit entirely (instead of editing it), let’s
simply tell Git that an empty commit is OK:
$ git commit --amend -C HEAD --allow-empty
[detached HEAD f2c576b] Create the workshop repository
 Date: Tue Dec 29 14:07:18 2015 -0500
Now that we’ve fixed up the target commit, tell Git to continue the rebase:
$ git rebase --continue
Auto-merging README.md
CONFLICT (content): Merge conflict in README.md
Automatic merge failed; fix conflicts and then commit the result.
Error redoing merge df7395f65a07159329dca0e0c11c9ceff8c5922a
Uh oh! Git had trouble re-applying our merge commit.
You’d think that Git could simply apply this previous merge conflict change
automatically. After all, we didn’t change the contents README.md at all!
All we did was remove password.txt, so what’s going on?
We commend you for your positivity, but want to gently let you know that Git cannot (typically) automatically re-apply merge commits. The world is a cruel place; you’re going to have to perform the merge again.
(As an aside: Git has a command called
rerere that you can manually run
after every merge to record merge information. I would simply recommend that
you avoid rebasing whenever possible.)
Open up README.md, and fix the merge conflict like before. Then, make a new
commit, and tell the rebase to continue:
$ git commit -a
[detached HEAD a9cf82c] Merge branch 'master' of https://github.com/GITHUB-USERNAME/Workshop2
$ git rebase --continue
Successfully rebased and updated refs/heads/master.
For the final step, push the changes to GitHub! You’ll have to do a dangerous
push -f, since you’ve rewritten history:
$ git push -f
Counting objects: 19, done.
Delta compression using up to 4 threads.
Compressing objects: 100% (18/18), done.
Writing objects: 100% (19/19), 2.19 KiB | 0 bytes/s, done.
Total 19 (delta 4), reused 0 (delta 0)
To https://github.com/GITHUB-USERNAME/Workshop2
 + df7395f...a9cf82c master -> master (forced update)
Check your commit history on GitHub to double check that everything looks OK. You should have 9 commits that look something like the following:

You should also verify that password.txt is no longer in the file listing:

… and that the original password commit is now empty:
![]()
If anything looks amiss, return to your second workshop clone, perform a
git push -f to force push the repository’s contents prior to the rebase,
and repeat this step.
So long as everything checks out, you’re done! Let’s hope neither of us has to do that again.
In the Real World, you will likely only use git rebase to clean up commit
messages before contributing changes to an open source project using the
squash verb. If you take away anything from this step, remember to always
make a backup clone of your repository before rebasing (or any other
destructive commit).
Step 11: Revert changes
If you perform a Git commit that breaks your project, you’ll likely want to
undo that commit. You can do this without rebasing using Git’s revert
command.
Git’s revert command creates a new commit that undoes a specified commit.
It is not destructive like rebase, so it is safe to use.
Let’s create a commit that we want to revert. Open up README.md, delete
the line containing the title (# Workshop 2: Git), commit the change, and
push it to GitHub.
Now, your repository should look something like the following:
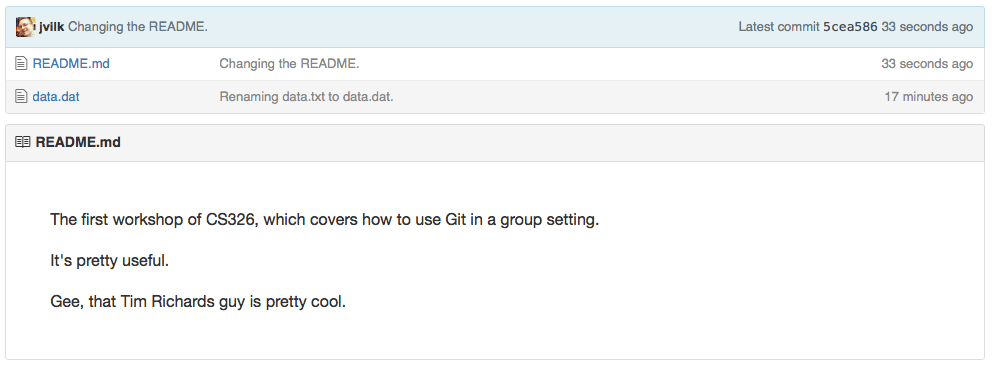
Yuck, that looks worse than before. We should restore the title!
The git revert command takes a commit hash as an argument. My commit above
has a hash beginning with 5cea586 (yours will be different), so I can
revert it as follows:
$ git revert 5cea586
[master 8555894] Revert "Changing the README."
 1 file changed, 1 insertion(+)
You should run the same command, but with the commit hash from your commit.
You may notice that I used only the first 7 characters from the commit hash in the above command, instead of the full commit hash. Git lets you abbreviate commit hashes as long as the abbreviation is unique.
In any case, push your changes to GitHub:
$ git push
Counting objects: 3, done.
Delta compression using up to 4 threads.
Compressing objects: 100% (3/3), done.
Writing objects: 100% (3/3), 359 bytes | 0 bytes/s, done.
Total 3 (delta 1), reused 0 (delta 0)
To https://github.com/GITHUB-USERNAME/Workshop2
   5cea586..8555894  master -> master
…and verify that the README title is restored!:
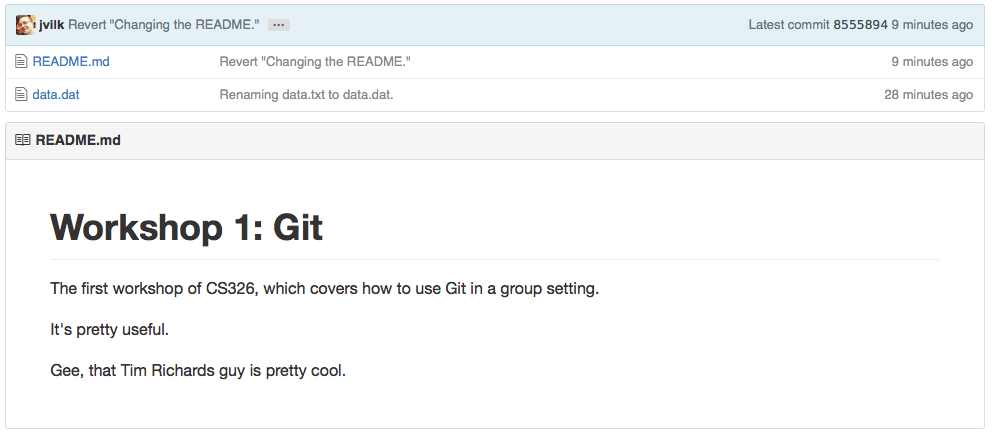
Also, look at the commit view. Notice that revert did not remove the old
commit; it merely added a new one that negated the changes from the old commit:

Step 12: Add your screenshots to the repository
We asked you to take two screenshots so far:
- In Step 07, we asked for a screenshot of
git pulloutput. - In Step 09, we asked for a screenshot of your deleted repository.
add the git pull output screenshot to the root of your repository as
git_pull.png, and add the screenshot of your deleted repository as
repo_deleted.png.
Create a commit for this change, and push it to GitHub.
Submitting your assignment, and other reading
Your GitHub repository should have 12 commits, like these:

If it does not, you may have missed a step! In that case, you could try rebasing your repository back to the step you messed up and try again.
You must submit the URL of your Workshop2 GitHub repository to Moodle. Visit Moodle, find the associated Workshop 2 activity, and provide your URL. Make sure your Workshop2 repository is public so we can clone your repository and evaluate your work.
Further reading: Branching, pull requests, and other topics
We didn’t have time to cover a number of other Git and GitHub features, so we recommend you read into the following topics:
- Branching: In this workshop, we used Git to store a linear sequence of
commits. However, Git has a feature called branches, which lets you create
additional independent lines of development. Here is a useful tutorial on branches
- Branches are typically used to develop features or large changes independently in large software projects. You may find them useful in your own team projects.
- Pull Requests: If you create a
cloneof someone else’s repository on GitHub (which GitHub calls “forking”) and fix a bug, you can open a Pull Request on GitHub, which requests that the original developer pull your changes and push them into the original repository. GitHub competitor BitBucket has a nice tutorial on Pull Requests that you may find useful.- Pull requests are useful for fixing bugs in or adding features to others’ code. You can use them to write code right now for the Atom Editor, Apple’s Swift programming language, Node.JS, and much more!