Workshop 06: JavaScript, Static React, and Facebook
- Introduction
- Step 00: Install Helpful Programs & Acquire Your Repository
- Step 01: “Ugh, World” widget
- Step 02: Facebook Feed as a Static React Component
- Step 03: Breaking the Feed Apart Into Subcomponents
- Conclusion
- Submission
Introduction
In the previous workshop, you created a static HTML mockup of Facebook’s desktop layout. In this workshop, we will take the first step toward making the mockup dynamic and interactive using JavaScript and the React library. In the next workshop, we will complete the transition by adding actual interaction on top of what we build in this workshop.
Our dynamic mockup will not contain a login page. Instead, it will assume that a single user is already logged in, and will only cover a small fraction of Facebook’s functionality – namely, posting status updates, comments, and using the iconic “Like” button. In a much later workshop, we’ll cover adding login support to your Facebook clone.
We are also going to make the following simplifying assumptions to make this workshop and the next go a bit faster:
- Comments cannot have comments. We’ll leave the “Reply” button on comments nonfunctional.
- Comments cannot have Likes. We’ll leave the “Like” button on comments nonfunctional…. until you add it in yourself in the next workshop. Up until that point, we’ll completely ignore that button.
- Links to other parts of the site are nonfunctional. By the end of this workshop and the next, you’ll know enough to add those in if you ever feel like it.
To make the mockup work, we’ll use a simple stub/mock database and a mock server.
With that said, let’s dive in!
Step 00: Install Helpful Programs & Acquire Your Repository
Web development can be stressful. Here are some programs and plugins that will make your life easier and prevent some of that stress.
Helpful Atom Packages
The Atom Editor contains many plugins that will help you during this assignment.
You can install the three we recommend with a single terminal command:
$ apm install react linter-eslint linter-htmlhint
Note: apm is
the Atom Package Manager. If you have Atom
open right now, you will need to close and re-open it before these
plugins take affect
Note 2: You can also search for and install packages from within Atom in the Packages section of Preferences.
Here’s what each plugin does:
react: Provides syntax highlighting support for the React language, among other neat features.linter-eslint: A linter for JavaScript and React. (For fun historical reasons, JavaScript is formally known as ECMAScript – hence the ES.) Linters look for common problematic coding patterns or errors, and point them out to you. This plugin will save you a lot of time debugging.linter-htmlhint: We covered this at the end of Workshop 3. It’s a linter for HTML. It does for HTML what ESLint does for JavaScript.
React Dev Tools for your Browser
React provides an extension for many web browsers that adds extra debug support for React applications. We recommend adding it to Google Chrome, as it nicely complements that browser’s existing development tools.
Acquire Your Repo
Fork
the
repository for this workshop. You
will notice that this repository is called Workshop4and5. Because
the workshops for this course are a work in progress our documentation
and repositories are slightly out of sync. To make sure you do not
confuse yourself you should clone your forked repository as a
different name on your local machine:
git clone https://github.com/USERNAME/Workshop4and5.git Workshop6
Note: replace USERNAME with your github user name.
You will be using the same repository for the next couple of workshops.
You’ll notice that the repository is eerily similar to the repository you’re using for your team project. In fact… it’s basically the same repository. :)
Here’s an explanation for each file in the repo:
.gitignore: Entries in this file are ignored by Git. We’ve added entries for automatically generated folders/files that you do not want to add to your repository, such asnode_modulesandbuild/js/app.js..eslintrc: A configuration file for ESLint, which tells the linter which problematic behavior to warn about. Thelinter-eslintpackage will read this file automatically.- You can add extra rules to this file if you want to, but most of you will want to keep the defaults.
- Here are some extra React rules you can choose to enable, too.
webpack.config.js: This is a webpack configuration script, which tellsnpm run serve(andnpm run build) how to build your project and serve it up over HTTP. You should not need to touch this script.app/: This is where you will put the JavaScript/React code for your application.app/app.js: The entrypoint to your application.- Webpack will pack up all of the JavaScript modules referenced from
this file into
build/js/app.jswhen you are runningnpm run serve. It’ll print out the list of files into the terminal running the webserver.
- Webpack will pack up all of the JavaScript modules referenced from
this file into
app/database.js: A simple mock database that we’ll use during this workshop.app/server.js: You will define a simple mock server in this file during this workshop.build/: This is where you put the HTML, CSS, images, web fonts, and other assets. There’s anindex.htmlin there currently with the Facebook clone we built in Workshop 3.package.json: Contains a list of NPM dependencies that you installed withnpm install, and the logic behind thenpm run servecommand. Do not mess with this file. The graders depend on thenpm run servecommand working properly.
You probably know the drill by now. git clone the repository, cd
into the directory, and run npm install to pull in its dependencies.
Once that’s complete, you can run npm run serve, which does two
things:
- Starts a webserver at http://localhost:8080/
- Starts up Webpack, which will
automatically rebuild
build/js/app.jswhen yourappfolder changes- … except that it doesn’t write the result to your disk! Instead,
it serves it up at
http://localhost:8080/js/app.js npm run buildwill run Webpack without the webserver, and will write the file to disk
- … except that it doesn’t write the result to your disk! Instead,
it serves it up at
Step 01: “Ugh, World” widget
If you haven’t already, run npm run serve in the workshop’s
repository directory, and keep it running for the entire
workshop. Open a web browser to http://localhost:8080/. You should be
confronted with the Facebook mockup from the last workshop.
Before we implement Facebook’s feed, let’s use React to implement a simple “ugh, world” React component, which simply prints the text “ugh, world”. React components can be thought of as templates for widgets on the webpage; they contain an HTML skeleton with holes that you can fill in with specific data.
Let’s write a simple “Ugh World” component that has no holes – it
just prints “ugh, world”. Add the following code to app/app.js:
import React from 'react';
import ReactDOM from 'react-dom';

class UghWorld extends React.Component {
  render() {
    return (
      <p>ugh, world</p>
    );
  }
}

ReactDOM.render(
  <UghWorld />,
  document.getElementById('fb-feed')
);
Note: If you have dabbled in React before this workshop, you may have
used something like React.createClass(...) to define Components. The
above code is equivalent, and
cleaner. :)
Here’s an overview on how to translate old React.createClass(...) code into new ES6 code.
If you refresh http://localhost:8080/, you’ll notice that the
Facebook Feed is replaced with a despondent “ugh, world”. Perfect!
If you have used JavaScript before, the above JavaScript may look alien to you. We’re using shiny new ECMAScript 6 features, which make code more readable, modular, and understandable. The Webpack script you are running compiles these features down to older-style JavaScript that runs across most web browsers, so you benefit from readable code without sacrificing browser compatibility.
Let’s break down the above code, line-by-line:
- On line 1, we
import React from 'react';.reactis an NPM module that you installed tonode_modules/react/when you rannpm install.- This statement imports the library into your application so you can use it.
- The library is available for use as the variable
React. - This is the library we use to define React components.
- JavaScript veterans: Here’s an overview
of
the new
importandexportfunctionality.
- On line 2, we do the same thing for
ReactDOM.- This library is used to render React components to the DOM.
- This is a separate library from
reactbecause React isn’t just for web applications – they have libraries to render React components as a part of desktop applications, too (ReactNative)
- On line 4, we define the
UghWorldcomponent as a class that extendsReact.Component.- Like in Java, we are declaring
UghWorldas a subclass ofReact.Component– so it inherits a number of methods from the component class. - JavaScript veterans: Here’s an overview on ECMAScript classes and inheritance.
- Like in Java, we are declaring
- On line 5, we define the
renderfunction, which all React components require. This function returns the HTML for this component.- Normally, you cannot include HTML in JavaScript. We’re actually using an extension to JavaScript called JSX, which was developed specifically for React.
- Unlike Java, there’s no type signatures indicating the types of
return values or arguments to the
renderfunction. JavaScript doesn’t have static types – meaning, you don’t specify the type of things at all when you are programming.
- Finally, on line 12, we tell
ReactDOMto render aUghWorldcomponent into thefb-feedelement on the webpage. Thefb-feedelement in the HTML document is called the mount point.- ReactDOM will replace the contents of the feed with the element
returned from
UghWorld’srender()function. - Notice how we refer to
UghWorldusing HTML notation. React virtualizes the DOM so that you can construct React components in the same way that you construct HTML elements. You cannot, however, refer to React components in an actual HTML file – you can only refer to them within JavaScript files.
- ReactDOM will replace the contents of the feed with the element
returned from
In build/index.html, we use a script tag to include the file
build/js/app.js, which Webpack generates every time you change the
source code in app/.
Make sense? If not, maybe things will get clearer as we use React a bit more.

commit your changes with the commit message “ws06 step 01 ugh
world widget”, and push your commit to GitHub.
Step 02: Facebook Feed as a Static React Component
Since we want to make the Facebook feed dynamic, our first step is to turn the Facebook feed into a React Component. Our first aim is nothing fancy: We want to create a React component that always returns the same HTML that our mockup currently has.
Delete your UghWorld component in app.js, as we no longer need
it, and create a new Feed component in the same manner. Cut the
HTML for the feed from index.html (leaving behind an empty fb-feed
div), and paste it into the render method of the Feed component.
app.js should now look like the following:
import React from 'react';
import ReactDOM from 'react-dom';

class Feed extends React.Component {
  render() {
    return (
      <!-- Status update entry -->
      <div class="fb-status-update-entry panel panel-default">
      <!-- (The rest removed for brevity) -->
    );
  }
}

ReactDOM.render(
  <Feed />,
  document.getElementById('fb-feed')
);
If you installed the recommended Atom packages, you’ll quickly notice an
error at the bottom of your editor coming from the eslint package:

Adjacent JSX elements must be wrapped in an enclosing tag. In other words,
render() needs to return one HTML element, but we’re returning
multiple in sequence.
To fix this, enclose the entire return value of render() in a single <div>.
This will not change what the feed actually looks like, since we are not applying
any special styling to this div.
Now, eslint will warn about another issue:

Unexpected token ! JSX doesn’t support HTML comment tags (<!-- -->). Strip all of them out.
eslint is still complaining, though:

In normal HTML, we can have elements like <hr> and <br>, which do not have
closing tags. With React/JSX, however, we have to explicitly close every tag.
Change instances of <hr> to <hr />, <br> to <br />, and <input ... > to <input ... />.
We’re almost done, but eslint is complaining again. This time, it’s spitting
out an error on nearly every line of the file:

This time, eslint objects to us using the class property on HTML elements,
and urges us to use the className property itself. This seems erroneous,
but it is actually an example of a leaky abstraction –
this unfortunate restriction is the direct result of how React is implemented.
We mentioned previously that we are using React’s extension to JavaScript called
JSX, which lets us include HTML snippets in JavaScript. JSX actually compiles
these HTML snippets into JavaScript. JavaScript has a long list of reserved keywords,
which you cannot use as identifiers in your program. class is among these reserved keywords.
As a result, you can not use any of those reserved identifiers as property names
in your React HTML snippets.
Since you need to use the class property to apply CSS styles to HTML elements,
React lets you set this property via the special className property. When
ReactDOM renders your components, it’ll apply the value of className to the
class property of the HTML element.
To fix this issue, replace every instance of class= with className=. You can
do this automatically using the “Replace All” feature of Atom; click on “Find” in
the Atom menubar, click on “Find in buffer…”, and fill out the fields at the
bottom of the editor screen:
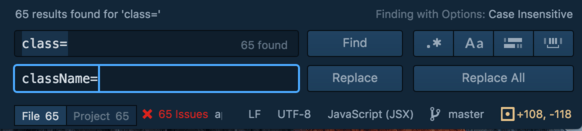
Once you click “Replace All”, all of the warnings should go away! And when you
go to http://localhost:8080/, you should see the Facebook feed, as it looked
like in the static mockup.
commit your changes with the message “ws06 step 02 facebook feed”
and push the commit to GitHub.
Step 03: Breaking the Feed Apart Into Subcomponents
Right now, we have a JavaScript file with a single React component, called Feed, that produces
a giant blob of HTML. We should break this component into subcomponents.
Let’s take a step back and think for a moment. What subcomponents should we make? Think about it for a moment…. and then read on.
A Facebook feed has a status update entry field, and a sequence of feed items. Each feed item has 1) some type of content, which may be a status update, advertisement, event, or something else; and 2) a comment thread. A comment thread contains a sequence of comments, followed by a comment entry box.
From this thought process, we should define the following React components to render the basic feed:
FeedStatusUpdateEntryFeedItemStatusUpdateCommentThreadCommentCommentEntry
We could define all of these components in a single file, but that
becomes hard to maintain. Instead, create the folder
app/components/, and put seven new JavaScript files into that folder
– one for each component (app/components/feed.js,
app/components/feeditem.js, app/components/statusupdate.js…).
Keep the files empty for now. We’re going to define each together, one
by one.
app/components/comment.js
To make this workshop simple, we’re going to define these components from the bottom up – starting with the smallest, most isolated component: Comments.
Open up app/components/comment.js in Atom, and paste in the following code:
import React from 'react';

export default class Comment extends React.Component {
  render() {
    return (
      <div>
        <div className="media-left media-top">
          PIC
        </div>
        <div className="media-body">
          <a href="#">Someone Else</a> hope everything is ok!
          <br /><a href="#">Like</a> · <a href="#">Reply</a> · 20 hrs
        </div>
      </div>
    )
  }
}
Notice how we have to import React again. Like with Java classes, every
JavaScript module has to import the things that it needs.
You may also notice the export default just before the class declaration on
line 3. This statement says: “When some other module imports the comment module, this is what is imported by default.”
This will make more sense when we write a module that references the comment
module.
In any case, this React component renders a single mockup comment in its current form. Let’s change it to be more like a template, where we can use it to render any comment.
On normal HTML elements, you can define attributes, like class and id, and
assign values to those elements. Similarly, React components support attributes,
but calls them props (properties).
In addition, normal HTML elements can have children. In the following example, a div
has two children: a span and a p:
<div><span></span><p></p></div>
React components support children, too. They can be accessed through the special
children prop.
Our comment needs the following properties:
author: The author of the comment.postDate: The date and time that the post was created.- The actual text of the comment – which can be specified as a child of the comment.
You can access named props through the props property on the component, and use
them in the template. Like in Java and other languages, the this variable
refers to the current object.
Re-define the render() method so it is more like a template:
export default class Comment extends React.Component {
  render() {
    return (
      <div>
        <div className="media-left media-top">
          PIC
        </div>
        <div className="media-body">
          <a href="#">{this.props.author}</a> {this.props.children}
          <br /><a href="#">Like</a> · <a href="#">Reply</a> ·
            {this.props.postDate}
        </div>
      </div>
    )
  }
}
When you’re writing HTML in React, you can insert JavaScript statements
between curly braces. When render() is run, React runs those JavaScript
statements, and uses their values in the resulting HTML.
Simply referring to {this.props.children} will insert all of the children of
the Comment in place.
Later on, when we describe how to create a status update in React, we can use the following HTML in React to re-create the comment that we just replaced with a template:
<Comment author="Someone Else" postDate="20 hrs">
  hope everything is ok!</Comment>
Note that props are read only. A component should never modify its own props. They
should only be set using the HTML syntax.
app/components/commententry.js
Since we’re not yet adding interactivity to our mockup, the comment entry is nothing special. Re-use the static HTML from the mockup. We’ll revisit this component later to handle text entry.
import React from 'react';

export default class CommentEntry extends React.Component {
  render() {
    return (
      <div>
        <div className="media-left media-top">
          PIC
        </div>
        <div className="media-body">
          <div className="input-group">
            <input type="text" className="form-control"
                   placeholder="Write a comment..." />
            <span className="input-group-btn">
              <button className="btn btn-default" type="button">
                <span className="glyphicon glyphicon-camera"></span>
              </button>
              <button className="btn btn-default" type="button">
                <span className="glyphicon glyphicon-heart">
                </span>
              </button>
            </span>
          </div>
        </div>
      </div>
    )
  }
}
app/components/commentthread.js
Next, let’s define the CommentThread component. A CommentThread displays a
list of Comments. It is most natural to define CommentThread such that
you can nest Comments as children, e.g.:
<CommentThread>
  <Comment author="Someone Else" postDate="20 hrs">
    hope everything is ok!</Comment>
  ...
</CommentThread>
So far, we know how to insert all of the children into a template all at once –
simply insert {this.props.children}. A CommentThread needs to enclose each
child comment into a list item (li) tag, so we need to iterate over the
comment thread’s children and translate them into list items.
React has a special function for doing just that for the children property:
React.Children.map.
A [map function](https://en.wikipedia.org/wiki/Map_(higher-order_function) performs an
operation on every element of an array, and assembles the result into a new array.
For example, given the array [0,1,2,3] and the function f(x) { return x + 1 ; },
applying the map function to the array and f would yield the array [1,2,3,4].
Note: JavaScript has map defined for regular JavaScript arrays, but the children property is a bit special. You should always use React.Children.map to iterate over a React component’s children.
Note 2: It’s special because children is either an only child or an array of children, so simply calling this.props.children.map will not work if there are multiple children. React does this for performance – it avoids creating an array in the only child case.
With this in mind, we can define the CommentThread in the following manner:
import React from 'react';

export default class CommentThread extends React.Component {
  render() {
    return (
      <ul className="media-list">
        {React.Children.map(this.props.children, function(child) {
          return (
            <li className="media">
              {child}
            </li>
          )
        })}
      </ul>
    )
  }
}
Here, the map function takes a child, and returns the child wrapped in a
list item (li).
We’re almost done! The CommentThread ends in a CommentEntry component, which
lets the user enter a comment. Since CommentEntry is defined in a separate
JavaScript module, we need to import it.
You may be tempted to write import CommentEntry from 'commententry';, but that would be incorrect.
You actually need to write import CommentEntry from './commententry';. The ./ is key:
the module system needs to know the path to commententry.js, relative to commentthread.js.
Modules without prefixes, like react or react-dom, are found in the node_modules folder.
This is a confusing subtlety, but that’s software!
Note: While Windows normally uses the ‘' character as a path separator, you must always use Unix-style path separators (‘/’) when specifying paths to modules – even when programming on Windows.
Our final CommentThread looks like this:
import React from 'react';
import CommentEntry from './commententry';

export default class CommentThread extends React.Component {
  render() {
    return (
      <ul className="media-list">
        {React.Children.map(this.props.children, function(child) {
          return (
            <li className="media">
              {child}
            </li>
          )
        })}
        <li className="media">
          <CommentEntry />
        </li>
      </ul>
    )
  }
}
Since CommentThread constructs a CommentEntry in its render function, it is
said to be the owner of CommentEntry.
app/components/statusupdate.js
By now, you may be getting the hang of React. Let’s create a basic
StatusUpdate component, using the contents of our static mockup. It consists
of two Bootstrap rows, so we will need to unify them under a single <div>:
import React from 'react';

export default class StatusUpdate extends React.Component {
  render() {
    return (
      <div>
        <div className="row">
          <div className="col-md-10">
            <div className="media">
              <div className="media-left media-top">
                PIC
              </div>
              <div className="media-body">
                <a href="#">Someone</a>
                <br /> Yesterday at 3:48pm · Austin, TX · <span
                  className="glyphicon glyphicon-user"></span>
              </div>
            </div>
          </div>
          <div className="col-md-2">
            <span className="caret pull-right"></span>
          </div>
        </div>
        <div className="row">
          <div className="col-md-12">
            ugh.
          </div>
        </div>
      </div>
    )
  }
}
What information goes into a Status Update? The above status update has the following information:
author: SomeonepostDate: Yesterday at 3:48PMlocation: Austin, TX- Contents: ugh.
These translate into the React Component properties we need. The contents can be specified as a child of the status update. Let’s rejigger the component as a template:
import React from 'react';

export default class StatusUpdate extends React.Component {
  render() {
    return (
      <div>
        <div className="row">
          <div className="col-md-10">
            <div className="media">
              <div className="media-left media-top">
                PIC
              </div>
              <div className="media-body">
                <a href="#">{this.props.author}</a>
                <br /> {this.props.postDate} · {this.props.location} · <span
                  className="glyphicon glyphicon-user"></span>
              </div>
            </div>
          </div>
          <div className="col-md-2">
            <span className="caret pull-right"></span>
          </div>
        </div>
        <div className="row">
          <div className="col-md-12">
            {this.props.children}
          </div>
        </div>
      </div>
    )
  }
}
app/components/feeditem.js
As mentioned before, a FeedItem contains some type of content, such as a
StatusUpdate, and a CommentThread. Let’s re-create the status update from our
mockup using these components.
import React from 'react';
import StatusUpdate from './statusupdate';
import CommentThread from './commentthread';
import Comment from './comment';

export default class FeedItem extends React.Component {
  render() {
    return (
      <div className="fb-status-update panel panel-default">
        <div className="panel-body">
          <StatusUpdate author="Someone" postDate="Yesterday at 3:48pm"
                        location="Austin, TX">
            ugh.
          </StatusUpdate>
          <hr />
          <div className="row">
            <div className="col-md-12">
              <ul className="list-inline">
                <li>
                <a href="#">
                  <span className="glyphicon glyphicon-thumbs-up">
                  </span> Like</a>
                </li>
                <li>
                <a href="#">
                  <span className="glyphicon glyphicon-comment">
                  </span> Comment</a>
                </li>
                <li>
                <a href="#">
                  <span className="glyphicon glyphicon-share-alt">
                  </span> Share</a>
                </li>
              </ul>
            </div>
          </div>
        </div>
        <div className="panel-footer">
          <div className="row">
            <div className="col-md-12">
              <a href="#">13 people</a> like this
            </div>
          </div>
          <hr />
          <CommentThread>
            <Comment author="Someone Else" postDate="20 hrs">
              hope everything is ok!</Comment>
            <Comment author="Another Person" postDate="20 hrs">
              sending hugs your way</Comment>
          </CommentThread>
        </div>
      </div>
    )
  }
}
An astute student may wonder why we are hardcoding everything into FeedItem,
rather than make them properties of FeedItem. The reason will become apparent
once we move onto the next big step, where we read data from a mock server!
We’ll return to that concern at that time.
app/components/statusupdateentry.js
Here’s the non-interactive StatusUpdateEntry widget, which is a boring
static React component:
import React from 'react';

export default class StatusUpdateEntry extends React.Component {
  render() {
    return (
      <div className="fb-status-update-entry panel panel-default">
        <div className="panel-body">
          <ul className="nav nav-pills">
            <li role="presentation" className="active">
              <a href="#"><span className="glyphicon glyphicon-pencil">
                </span> <strong>Update Status</strong></a>
            </li>
            <li role="presentation">
              <a href="#"><span className="glyphicon glyphicon-picture">
                </span> <strong>Add Photos/Video</strong></a>
            </li>
            <li role="presentation">
              <a href="#"><span className="glyphicon glyphicon-th">
                </span> <strong>Create Photo Album</strong></a>
            </li>
          </ul>
          <div className="media">
            <div className="media-left media-top">
              PIC
            </div>
            <div className="media-body">
              <div className="form-group">
                <textarea className="form-control" rows="2"
                          placeholder="What's on your mind?">
                </textarea>
              </div>
            </div>
          </div>
          <div className="row">
            <div className="col-md-6">
              <div className="btn-group" role="group">
                <button type="button" className="btn btn-default">
                  <span className="glyphicon glyphicon-camera"></span>
                </button>
                <button type="button" className="btn btn-default">
                  <span className="glyphicon glyphicon-user"></span>
                </button>
                <button type="button" className="btn btn-default">
                  <span className="glyphicon glyphicon-heart">
                  </span>
                </button>
                <button type="button" className="btn btn-default">
                  <span className="glyphicon glyphicon-pushpin"></span>
                </button>
              </div>
            </div>
            <div className="col-md-6">
              <div className="pull-right">
                <button type="button" className="btn btn-default">
                  <span className="glyphicon glyphicon-user"></span>
                    Friends <span className="caret"></span>
                </button>
                <button type="button" className="btn btn-default">
                  Post
                </button>
              </div>
            </div>
          </div>
        </div>
      </div>
    )
  }
}
app/components/feed.js
Since most of the data is in StatusUpdate, the Feed component is now quite
boring. It holds a StatusUpdateEntry and a FeedItem:
import React from 'react';
import FeedItem from './feeditem';
import StatusUpdateEntry from './statusupdateentry';

export default class Feed extends React.Component {
  render() {
    return (
      <div>
        <StatusUpdateEntry />
        <FeedItem />
      </div>
    )
  }
}
app/app.js
Back in the main entrypoint of your application, we simply render a Feed
into the fb-feed element on the webpage:
import React from 'react';
import ReactDOM from 'react-dom';
import Feed from './components/feed';

ReactDOM.render(
  <Feed />,
  document.getElementById('fb-feed')
);
On line 3, notice that we specify a relative path to feed. app.js is in the app folder,
and feed is in the app/components folder, therefore we use the path ./components/feed.
Examine the page
Now, open your web browser to http://localhost:8080/. If you already
have your web browser open to that page, make sure you hit “Refresh”
to pull in the new code you just wrote. You’ll notice that the static
mockup looks the same as ever.
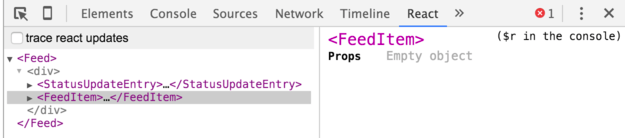
If you installed the React Dev Tools and open the Chrome Development Tools to the “React” tab, you’ll see all of the components you’ve defined!
add all of the files in components, commit with message “ws06
step 03 breaking the feed apart into subcomponents”, push to
GitHub
Conclusion
Now that we have the basic framework put together for Facebook using react we will need to work on populating our user interface with data. We will do this with mock data in the browser initially.
We will tackle how to do this in the next workshop!
Submission
You must submit the URL of your Workshop4and5 (Workshop6) GitHub repository to Moodle. Visit Moodle, find the associated Workshop 6 activity, and provide your URL. Make sure your Workshop4and5 (Workshop6) repository is public so we can clone your repository and evaluate your work. Submitting the URL for this assignment is part of completing the work.