Workshop 09: Writing a Web Server
- Overview
- Grading Rubric
- Git Repository Introduction
- HTTP
- Applying HTTP to Facebook
- Setup and Background: Node and Express
- Writing a Server for Facebook
- Setup
- Serve up HTML, CSS, and JavaScript
- Migrate Data to Mock Database on Server
- Implement a single route on the server
- Communicating with the Server from the Client
- Handling HTTP Requests That Fail
- postStatusUpdate, and Validating Data with JSON Schema
- Implement the Rest of the Routes
- Commit Your Changes
- Add Comment Routes Yourself!
- Conclusion
- Submission
Overview
In the previous workshop, you created a dynamic mockup of Facebook using React. The mockup lets you post status updates and comments as a single user, and let you “Like” things too. The mockup saved all of the data in your browser, so that if you revisited it from the same computer using the same web browser, you would see the same status updates, comments, and Likes as the last time you visited the webpage.
In this workshop, we’ll extend that dynamic mockup with a custom HTTP server. With a server, the mockup will have the same status updates, comments, and “Likes” across web browsers and computers. We will continue to assume that a single user is logged in; we still need to add a database before we are ready to handle user authentication.
Please be sure to check the grading rubric before starting. If you are missing a part of the assignment, we assign you 0 points for that rubric item regardless of the quality of your submission.
Grading Rubric
- 10%
nodecommit - 5%
expresscommit - 5%
staticcommit - 5%
databasecommit - 5%
getFeedDatacommit - 5%
facebookGotServedcommit - 10%
failbookcommit- 5% Error banner screenshot
- 5% Code for the error banner / error handling
- 10%
validationcommit - 15%
almostDonecommit - 30%
missionAccomplishedcommit- 10% Add a route to the server for
postComment,likeComment, andunlikeComment. - 10% Update the functions in
client/app/server.jsto issue HTTP requests. - 5% Create a JSON schema for comment data, and place it into
server/src/schemas/comment.json - 5% Validate comment data input to
postCommentusing the JSON schema.
- 10% Add a route to the server for
Git Repository Introduction
To get the starter code for this workshop, open up the terminal, cd into your class folder, fork the repository, and cd into the repository folder.
Note: Yes, the name of the repository is Workshop6, it will be updated in future offerings of this course.
Below, we explain the folder structure of the git repository, the extra features we have added to the Facebook client, and changes we have made to the mock database. You should not skip this section – some of the changes we have made may be useful sample code to look at for your startup products!
Folder structure
The Git repository has two folders:
client/: Contains the client side of the web application.- This contains all of the JavaScript/HTML/CSS that runs in a user’s web browser.
- Right now, it contains the dynamic mockup from the previous workshop.
- We will alter the client to query data from a server in this workshop.
server/: Contains the server side of the web application.- This contains all of the JavaScript and server files that run on your server – which would typically be a machine in the cloud.
- Right now, it only contains a few files. We will fill this out with a server in this workshop.
We will later cover the commands you need to run to set up these folders.
Mock Database Improvements
We’ve added the following functions to the mock database:
deleteDocument(collection, id): Deletes an object in a collection.getCollection(collection): Returns all objects in a collection. Makes it possible to emulate database queries.
We have also added basic error messages to the database to make it clear when your code is accessing invalid database collections or objects.
Facebook Changes
To check out the updated Facebook mockup, run the following terminal commands from the repository folder:
$ cd client
$ npm install
$ npm run serve
Then, open your web browser to http://localhost:8080/.
We have added the following features to Facebook since the previous workshop:
- Edit Status Updates: Click the caret in the corner of status updates you’ve authored (where “you” is the logged in user – “John Vilk”), and click on “Edit Status Update”.
- Delete Status Updates: From the same menu, click “Delete Status Update”.
- Search: Type a search query into the search bar at the top, and click the search button or hit enter. The search will return results that include the text in the content of the status update itself.
- Moved HTML into Components: We have moved elements on the page like the left and right menus into React components to make Facebook more like your startup products.
Let’s look through some of the code changes we had to make to get these features working!
Edit/Delete Dropdown
The dropdown is in app/components/statusupdate.js. We added a Bootstrap dropdown menu into the render() function of the StatusUpdate component. While the sample Bootstrap dropdowns use button elements as the dropdown target, you can use any element you want as the target:
<div className={"dropdown"}>
  <span className="caret pull-right dropdown-toggle"
	    data-toggle="dropdown"></span>
  <ul className="dropdown-menu">
    <li className={hideElement(this.props.author._id !== 4)}>
		<a onClick={(e) => this.onEditClick(e)}>
		  Edit Status Update</a>
	</li>
    <li className={hideElement(this.props.author._id !== 4)}>
		<a onClick={(e) => this.onDelete(e)}>
		  Delete Status Update</a>
	</li>
    <li><a href="#">Hide Post</a></li>
  </ul>
</div>
Notice how the “Edit” and “Delete” dropdown menu items are always included in the return value from render(), but, on Facebook, they only show up on posts that you have authored. Rather than not include them in the return value of render(), we set their CSS property display to 'none'. This is a simple HTML trick that React recommends you use when convenient.
We added a CSS class to build/css/facebook.css to set this property:
/* Prevent an HTML element from displaying at all. */
.hidden {
  display: 'none';
}
We use a helper function called hideElement to app/util.js that returns hidden when the input test is true:
/**
 * If shouldHide is true, returns a CSS class that hides the element.
 */
export function hideElement(shouldHide) {
  if (shouldHide) {
    return 'hidden';
  } else {
    return '';
  }
}
Thus, when this.props.author._id !== 4, both the Edit and Delete items are effectively removed from the UI.
Delete Status Update
Clicking on the “Delete” item in the dropdown menu calls this.props.onDelete. Feed provides onDelete to FeedItems, and FeedItem passes it on to StatusUpdate. onDelete simply calls Feed.deleteFeedItem(id):
deleteFeedItem(id) {
  deleteFeedItem(id, () => {
    this.refresh();
  });
}
deleteFeedItem is a new server method, which uses the new deleteDocument database function:
/**
 * Deletes a feed item.
 */
export function deleteFeedItem(feedItemId, cb) {
  // Assumption: The current user authored this feed item.
  deleteDocument('feedItems', feedItemId);
  // Remove references to this feed item from all other feeds.
  var feeds = getCollection('feeds');
  var feedIds = Object.keys(feeds);
  feedIds.forEach((feedId) => {
    var feed = feeds[feedId];
    var itemIdx = feed.contents.indexOf(feedItemId);
    if (itemIdx !== -1) {
      // Splice out of array.
      feed.contents.splice(itemIdx, 1);
      // Update feed.
      writeDocument('feeds', feed);
    }
  });

  // Return nothing. The return just tells the client that
  // the server has acknowledged the request, and that it has
  // been a success.
  emulateServerReturn(null, cb);
}
Edit Status Update
We changed app/components/statusupdate.js so that it contains the following state variables:
this.state = {
  // If 'true', the user is currently editing the status update.
  editing: false,
  // If 'true', the user clicked 'edit', and the status update is waiting
  // for the edit to occur.
  editSubmitted: false,
  // The current value of the edited status update. As the user types data into
  // the edit box, this value updates.
  editedValue: ''
};
In render(), we only display the edit dialog when editing is true, and we also hide the status update:
<span className={hideElement(!this.state.editing)}>
  <textarea disabled={this.state.editSubmitted}
	        className="form-control fb-status-update-edit-box"
			rows={countLines(this.state.editedValue).toString()}
			value={this.state.editedValue}
			onChange={(e) => this.handleEditChange(e)} />
  <span className="fb-status-update-edit-buttons">
    <div className="btn-group">
      <button className="btn btn-default"
        onClick={(e) => this.onEditCancel(e)}
	    disabled={this.state.editSubmitted}>Cancel</button>
    </div>
    <div className="btn-group pull-right">
      <button className="btn btn-default"
        onClick={(e) => this.onEdit(e)}
		disabled={this.state.editSubmitted}>Edit</button>
    </div>
  </span>
</span>
<span className={hideElement(this.state.editing)}>
{
  this.props.value.split('\n').map((line, i) => {
    return <p key={"line" + i}>{line}</p>
  })
}
</span>
We set disabled to true on the Edit button, Cancel button, and the textarea when editSubmitted is true; this prevents the user from making a second edit before the server responds.
When the StatusUpdate component receives new properties, it knows that a server request has completed since FeedItem has re-rendered the StatusUpdate with the new properties; it can reset its state to return to the regular StatusUpdate view:
componentWillReceiveProps() {
  if (this.state.editing && this.state.editSubmitted) {
    // Component has received its new status update text!
    this.setState({
      editing: false,
      editSubmitted: false
    });
  }
}
Search
app/app.js has a new class called SearchResultsPage, which handles the route /search. It expects a parameter called query, so http://localhost:8080/search?query=foo will link to the search results for the query “foo”.
SearchResultsPage renders a single SearchResults component, which is also defined in app/app.js. It uses the search query as that component’s key, and also passes the query as a prop. SearchResults queries the mock server for search results when it is first mounted (via componentDidMount), and sets its state with results once the server responds.
If the search query changes, SearchResultsPage will render a SearchResults with a different key, causing React to create a new instance of the SearchResults component. If the query does not change, it renders a SearchResults with the same key, causing React’s diffing algorithm to keep the old instance. This design bypasses some of the state issues some startups had with their search pages – no more need to handle componentWillReceiveProps!
app/server.js contains a new route called searchForFeedItems, which searches the current user’s feed for FeedItem entities whose contents contain the search query.
app/components/searchbar.js programmatically navigates to the search page using React-Router when a user enters a search query into the navigation bar. If the current page is the search page, SearchBar receives the current search from the Navbar component in app/components/navbar.js, which receives it from the App component in app/app.js.
HTTP
We discussed HTTP in depth; you may want to review those slides before proceeding further. We will recap the information below, and build on it to create our webserver.
Overview
HTTP is a protocol (i.e. a set of rules) that dictate how a client and a webserver talk to one another. Typically, the client is a web browser. HTTP uses messages to communicate between clients and webservers. There are two types of messages:
- Request: A Request is a message sent from the client to the webserver.
- Response: A Response is a message sent from the webserver to the client in response to a request.
Here are some overall rules regarding HTTP messages:
- A webserver must send a single response to all requests. This statement has two implications.
- All requests must receive a response: If a client does not receive a response to a request, it has no idea if the server ever received the request. Even if the response is empty, it tells the client that the server received the request.
- If no response ever arrives, then either the webserver is down, the network is having a problem, or the webserver is ignoring the request entirely.
- Servers cannot send multiple responses to a single request: The client needs to know that when it can stop expecting messages from the server so it can get on with its business. This rule lets the client break away once it receives responses to all of its requests.
- All requests must receive a response: If a client does not receive a response to a request, it has no idea if the server ever received the request. Even if the response is empty, it tells the client that the server received the request.
- A webserver can only communicate with the client via responses. While a client can contact a server at any time, a server cannot send a message to a client at any time. It can only communicate with a client through responses to client requests.
- There is a web standard that lets web servers “push” data to clients using unsolicited HTTP responses, but it is not yet supported in all browsers and seems unlikely to come into common use. (It’s over a decade old now.)
- Most web browsers have standardized around WebSockets instead for “push” features, which does not use HTTP at all for the connection.
- We will not cover WebSockets in the course.
- A common technique for emulating “pushed” data is to have the client poll for it by sending a request on a regular basis. For example, a chat application may ask the server if there are new chat messages every 50 milliseconds using a
GETrequest.
With those rules in mind, let’s describe the two message types.
Requests
Requests have four main components:
- Verb: The action to perform.
- Example:
GETretrieves the contents of a target
- Example:
- Resource: The target of the action.
- Example:
/feeditem/3is the Feed Item with ID 3.
- Example:
- Body (optional): Any data required to carry out the action.
- Example: A Status Update in JSON form when creating a new status update
- Header (metadata): Metadata about the response, including information about the client (what version of HTTP to use, what responses the client accepts, etc.)
- The Header is where you put authentication tokens, which we will explain soon.
- Most of this data is automatically created for you. You can add arbitrary fields of data to this header, too.
- Sidenote: HTTP is decades old, so this metadata contains all of the information the server needs to figure out how to respond. For example, newer HTTP clients, like your web browser, support compressed responses, which reduces the size of messages using a compression algorithm. Some HTTP clients may not support compression. The metadata tells the server if it can compress the response or not. But, again, all of the APIs you deal with in this course will handle these details for you.
- Wikipedia has a list of common header fields
There are 4 main verbs we will use in this course, which are all that most web developers ever need. There are a number of others that are available, and you can feel free to use them in your startups if they seem useful. The 4 main verbs are:
- GET: Retrieve a specified resource.
- Example:
GET /feeditem/3retrieves the FeedItem with ID 3.
- Example:
- POST: Typically, POST creates a new resource as a subordinate of the target resource using the specified data. POST doesn’t have to create a new resource, though.
- Example:
POST /feeditem [feed item JSON object]creates a new FeedItem (e.g./feeditem/4) with the specified data. The server can tell the client what the new Feed Item’s ID is in the response.- Note that
/feeditem/4is a subordinate of/feeditem.
- Note that
- Example:
POST /forgotpasswordemail { email: "[email protected]" }sends a “Forgot Password” email to the given email.- Note that this does not create a new resource!
- Example:
- PUT: Create or change the target resource using the given data.
- Example:
PUT /feeditem/3 [feed item data]modifies the Feed Item with ID 3 using the given data.
- Example:
- DELETE: Delete the target resource.
- Example:
DELETE /feeditem/3deletes the Feed item with iD 3.
- Example:
HTTP requests should be stateless; each individual request should contain all the information necessary to service the request. As you can see from the above examples, the intent of an individual HTTP request is quite explicit, and can be understood without knowing what requests have come before or after. This is not typically true of the English language, where the meaning of a sentence depends on the context surrounding it!
Responses
Once a web server receives a request, it needs to decide how to handle it – or if it should handle it at all! Its response should reflect what it decided to do.
An HTTP response contains the following data:
- Status Code: A response always contains a HTTP status code, which describes the nature of the response (or the error if one has occurred).
- Famously,
404is “NOT FOUND” – the target resource was not found.200is OK,201is CREATED (a new resource),401is UNAUTHORIZED. These 3 are the most common that you will use. - New HTTP status codes are continually emerging, too.
- Famously,
- Body (optional): Additional data associated with the response.
- Example: The body of a successful
GET /feeditem/3response would contain the contents of that feed item.
- Example: The body of a successful
- Header (metadata): Like with the header on requests, the header of the response contains metadata about the server, which informs the client how it may communicate with the server / what features the server supports.
- You will not have to worry about the header in this course, as the APIs you will use automatically handle it for you.
Example responses:
- Successful
GET /feeditem/3: Status code200(OK), body contains the feed item - Successful
POST /feeditem [feed item data]: Status code201(CREATED), body contains the feed item data, and, special for the201status code, the header containsLocationset to/feeditem/:feeditemid, where:feeditemidis the ID of the new feed item. - Successful
PUT /feeditem/3 [feed item data]: Status code200(OK), body contains modified feed item. - Successful
DELETE /feeditem/3: Status code200(OK), body is empty.
Authentication with Tokens
How does the web server know who is sending a particular request? It uses tokens! In this class, we will use JSON Web Tokens. In the HTTP response to an HTTP request where a user logs in with a correct username/password, the server sends an encrypted JSON object that only the server can decrypt. The encrypted JSON object appears as a string of random-looking letters and numbers. The client cannot decrypt the string, and has no idea what it contains. Assuming the server is using the latest and greatest in encryption, and its encryption key is properly kept secret from prying eyes, it is infeasible for anyone but the server to create these tokens.
The client will send this token with all future HTTP requests to verify its identity. If the server can successfully decrypt the token, it knows that the token must have come from itself! (Otherwise, someone has forged an encrypted JSON object, which is infeasible unless they had the server’s encryption key.)
A JSON web token can contain any data that you want it to. Typically, it will only contain the requester’s username and an expiration date, but it’s completely up to you! Since the token will be sent with every HTTP request, you’ll want to make it short.
We won’t be using full-blown JSON web tokens in the class until we cover user login in a later workshop. Instead, for this workshop and for your startup submission, you will send unencrypted JSON objects with all “privileged” HTTP requests that contain the same information you would put into a token. Later on, you can reuse all of the logic you’ve developed in this workshop and your startup submission when you transition to real JSON Web Tokens. :)
Applying HTTP to Facebook
Now that we have discussed HTTP requests and responses, let us figure out how to map entities from our database onto HTTP resources! Note that there are multiple ways that we could map these objects to HTTP resources. We are merely presenting one consistent way to go about doing it in this case.
We will also discuss how to map mock server methods onto HTTP requests over HTTP resources.
You are going to have to do some thinking here. If you had trouble understanding what we mentioned in the previous section (or, worse, skipped it!), you may want to go back and review it.
Mapping Facebook Objects to HTTP Resources
As a reminder of Facebook’s entities, here is the Facebook ER diagram:
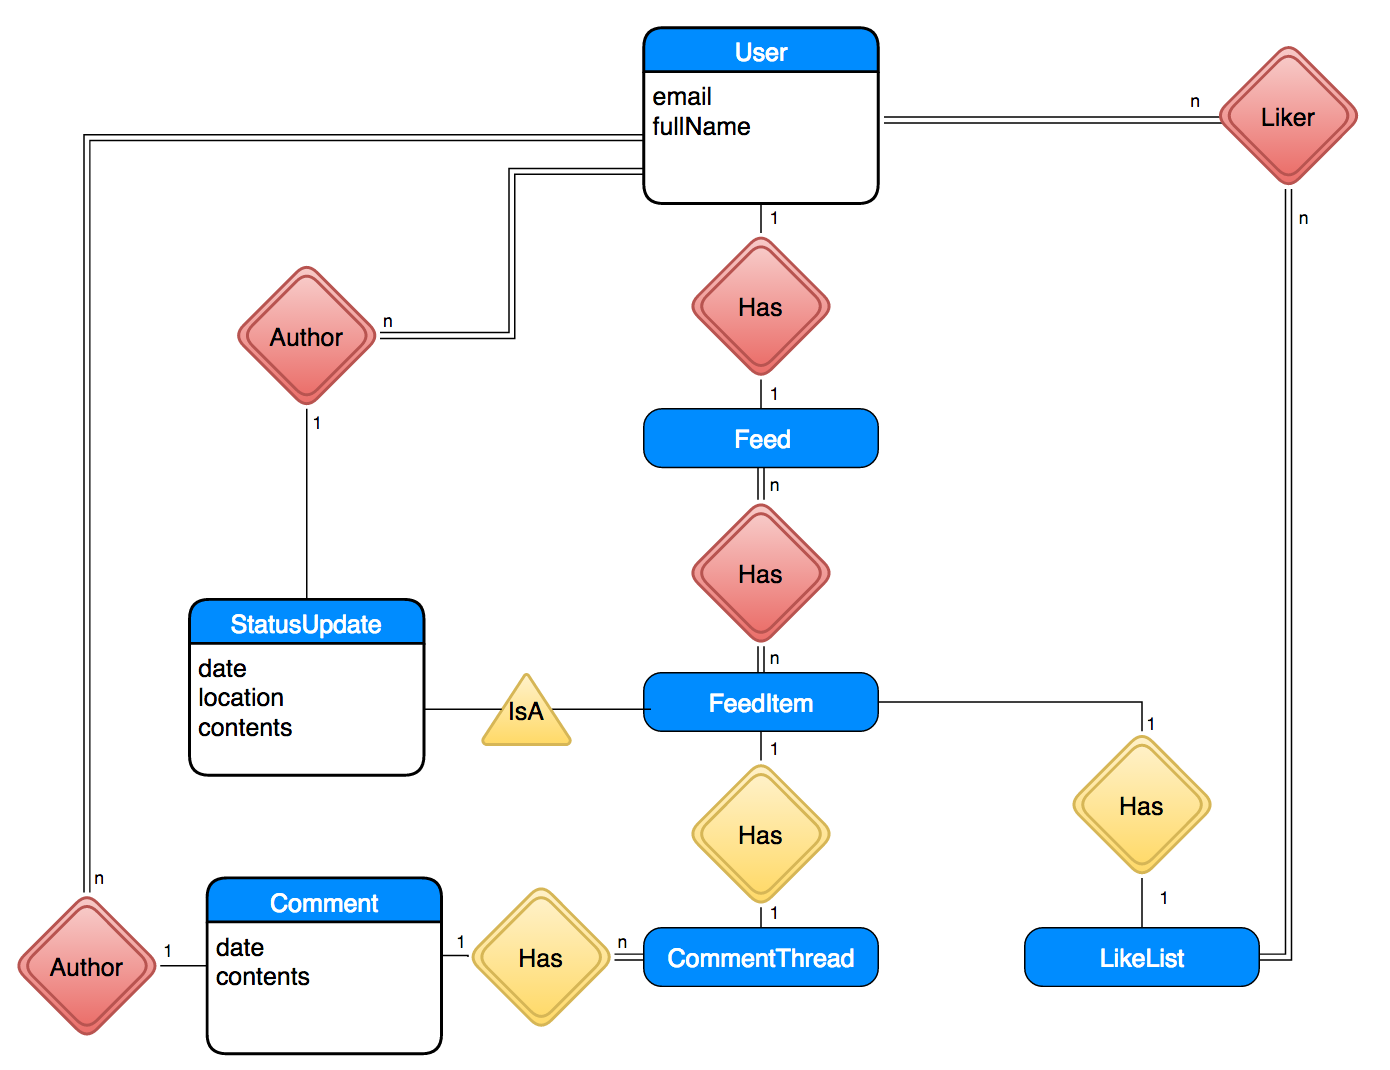
Here are some general rules on how to map the labeled ER diagram to HTTP resources:
- Embedded entities should be subordinates of the URL to the entity they are embedded into.
- For example, the
LikeListfor aFeedItemlocated at/feeditem/3should be accessible at/feeditem/3/likelist. Then, if someone successfully executesDELETE /feeditem/3, naturally any subordinate of/feeditem/3, such as theLikeListare also gone. If theLikeListwere at/likelist/3, thenDELETE /feeditem/3would unnaturally also delete/likelist/3.
- For example, the
- Entities that were not embedded previously due to size concerns should be subordinates of the URL to the entity they were nearly embedded into.
- For example, we decided not to embed a User’s Feed into the User entity, since the Feed could be quite large and is not typically requested alongside a user. However, it clearly belongs to the user. Thus, the Feed should be accessible as a subordinate to the owning User’s URL, e.g.
/user/3/feed.
- For example, we decided not to embed a User’s Feed into the User entity, since the Feed could be quite large and is not typically requested alongside a user. However, it clearly belongs to the user. Thus, the Feed should be accessible as a subordinate to the owning User’s URL, e.g.
- Otherwise, referenced entities should be their own top-level URL. For example, users should be accessed at
/user/:userid.
With that in mind, let’s translate all of the relevant entities in the diagram into HTTP resources:
User:/user/:useridFeedItem:/feeditem/:feeditemid(While authored by a particular user, they belong to multiple feeds and could potentially persist after a user account is deleted.)Feedfor a user:/user/:userid/feedLikeListfor aFeedItem:/feeditem/:feeditemid/likelist- An individual
Likein theLikeList:/feeditem/:feeditemid/likelist/:userid- Note: One cool thing about HTTP is these types of hierarchies. In some systems,
GET /userwill get you a listing of all users, andGET /user/[userid]will get you one particular user. Here, we are doing the same thing with theLikeList!
- Note: One cool thing about HTTP is these types of hierarchies. In some systems,
Now, you must decide where the following entities can be accessed:
CommentThread: The resource for aCommentThreadshould be the parent resource of an individual comment (e.g. in/foo/bar/0,/foo/baris the parent). Where should a commentthread be?Comment: Where should a comment be?LikeListfor aComment: Where should a comment’s LikeList be?
Record your answers somewhere. We will revisit them later on in the workshop, when you actually implement them. Please do this now before proceeding; we want you to use your conceptual understanding of HTTP to answer these questions before we dive into programming servers!
Note that since StatusUpdate isa FeedItem, we did not give it a unique URL; all FeedItems are accessed via /feeditem.
Mapping Facebook Server Methods to HTTP Requests
We have mapped Facebook database entities to HTTP resources. Now, we can figure out the verbs to apply to those resources to bring the mock server methods to life! Like before, you will be responsible for figuring out some of these methods yourself.
getFeedData(userid, cb): Returns the Feed for the user with a given id.
This server function returns the feed associated with a user. The GET verb makes the most sense.
Thus, we will implement this server function using the request GET /user/:userid/feed (e.g. GET /user/4/feed). A successful response will return the 200 (OK) status code, along with the resolved feed in the body.
postStatusUpdate(user, location, contents, cb): Creates a new status update for the given user at the given location and with the given contents. Returns the new status update, along with its ID.
The server decides the new status update’s ID. The POST verb makes the most sense here, since the client does not know what the new feeditem’s ID will be and the request should create a new resource.
Thus, the request for this server function will look like the following: POST /feeditem { userId: user, location: location, contents: contents }
A success response should use the 201 (Created) status code, and include the FeedItem in the body of the response. Because we are using the 201 status code, the response should include the final URL for the newly-posted item in the Location field of its header.
likeFeedItem(feedItemId, userId, cb): Adds the given user to the like list on the given feed item.
The URL to the LikeList of a FeedItem is /feeditem/:feeditemid/likelist. The URL to a user’s like is /feeditem/:feeditemid/likelist/:userid. Since we know the URL to the user’s ‘like’ in the list, we can use PUT!
Thus, PUT /feeditem/:feedItemId/likelist/:userId is the request we would use. A success response should indicate 200 (OK).
unlikeFeedItem(feedItemId, userId, cb): Removes the given user from the like list on the given feed item.
We want to remove a user’s ‘like’ from the like list, so DELETE is the most appropriate verb.
DELETE /feeditem/:feedItemId/likelist/:userId is the request we would use. A success response should indicate 200 (OK).
updateFeedItemText(feedItemId, newContent, cb): Update the text of the Feed Item with the given ID. Assumes the feed item is a status update.
The client knows the ID of the feed item it wants to update, so it knows the URL to that feed item (/feeditem/:feedItemId). PUT seems to be the most appropriate verb; the user wants to change the content of a resource at a known location.
PUT /feeditem/:feedItemId updatedFeedItem seems like a clear choice for the request, but it’s actually not! The user only wants to update the content on a Feed Item, and not the entire Feed Item object. Recall that a Feed Item also contains other bits of information unrelated to this update, such as a LikeList and Comments. It is possible that a second user is simultaneously adding a comment to the same Feed Item as the author updates the Feed Item. You don’t want to wipe out their update!
Instead, we’ll use the request PUT /feeditem/:feedItemId/content newContent, which clearly only updates the content of a Feed Item. The response can contain the updated content of the Feed Item.
deleteFeedItem(feedItemId, cb): Deletes the Feed Item with the given ID.
By now, you should be getting the hang of this. The Feed Item is at URL /feeditem/:feedItemId, and we want to delete it… so we will use the request DELETE /feeditem/:id!
searchForFeedItems(userID, queryText, cb): Searches for Feed Items with the given query text.
This is a weird HTTP request. What verb do you think this should use? It’s a read-only operation, so you might be tempted to say GET, but GET is for retrieving a particular named resource; this is a request to perform an operation to locate resources!
Many services use POST for search requests, as the operation is not something that fetches
a named item or creates data. Thus, we will use POST, too.
What URL should we use? In this case, the URL is not the location of the data, but the location of the operation that we are invoking with POST. The operation is search, so we can simply use /search. The final HTTP request is POST /search queryText. (Note: Since userID is always the user ID of the current user, we can simply pull that piece of data from the JSON web token.)
If we wanted to support more advanced search queries (e.g. searches for users!), we could simply send a JSON object to /search that describes the search (e.g. { for: "users", query: "searchQuery" }. Or, we could create additional search resources for different search operations (e.g. /search/users).
The Rest
What HTTP requests do you think should be used for the following server methods?
postComment(feedItemId, author, contents, cb)- Will your request still work properly if two users submit a comment at roughly the same time? It should!
likeComment(feedItemId, commentIdx, userId, cb)unlikeComment(feedItemId, commentIdx, userId, cb)
Record your answers. We will revisit them later when you actually implement these methods on the server.
Authentication
To service a HTTP request, the Facebook server needs to know the requesting user’s ID. It does not need to know any additional information.
Facebook JSON web tokens will contain the following information:
{
  // The user's ID.
  "id": 4
}
That’s all of the information Facebook requires to authenticate a user’s access to information.
Since we are not covering authentication in this workshop, all HTTP requests will include an unencrypted string version of that object so the server knows who the request is coming from. We will hardcode the JSON object in the client.
This setup will make it easy to transition to “proper” authentication later on; we simply drop in a decryption routine on the server, and implement a login page on the client!
Fun Note: A more advanced setup might also put an expiration date into the token to auto-logout the user when the token expires.
Setup and Background: Node and Express
Now that we know what HTTP is and how we will apply it to our Facebook mockup, it’s time for us to get acquainted with the software we will be using to write the server. You will write and debug code in these sections, and commit proof to the repository!
If you skimmed the previous section, or if it did not make sense, I urge you to look it over again. Check out some of the links, too, if they help. If you’re still lost, please post a public question to Piazza!
Setup
First, open up a terminal and install Node Inspector, which we will use to debug Node projects:
$ npm install -g node-inspector
Note: If the above command fails on Linux or Mac, try running it with sudo.
Next, install Postman. You can either install it to Google Chrome as an “Chrome App”, or install the standalone version if it is available for your platform; they are essentially the same thing. Postman makes it easy for you to test your web server with HTTP requests.
Next, open a terminal to this workshop’s Git repository folder. cd into server, and run the following command:
$ npm install
This command will install all of the server’s Node.js dependencies.
Finally, run the following command within the server folder to open up the Atom editor in the server folder:
$ atom .
Node.JS Introduction
Node.JS lets you write normal, non-browser applications in JavaScript. It doesn’t run these applications in a web browser, and it doesn’t have a DOM for GUIs, doesn’t support HTML or CSS, and is intended primarily for web server applications. Node.JS is popular because it lets developers write servers and clients in the same programming language: JavaScript. JavaScript also runs very quickly compared to programming languages like PHP, Ruby, and Python, which are also popular choices for server software. (It’s not quite as fast as Java, though! Java is very fast.)
Node.JS ships with many APIs that are not present in the web browser, such as an API for reading/writing files and opening TCP/UDP sockets. You will not need to many use these interfaces directly in this course, though; we will use Node libraries that make it easy to write a web server, much like how we used React to write a web application instead of raw HTML/CSS/JavaScript!
Now that we have introduced Node.JS, let’s cover how to write, modularize, and debug a simple program!
“Hello World!”
You should have Atom open within the server folder of the Git repository. Create a new file called src/helloworld.js, and include the following inside of it:
console.log("Hello World!");
Save the file, and open a terminal to the server folder of the Git repository. Run your new Node.JS program with the following command:
$ node src/helloworld.js
Hello World!
Congratulations, you just wrote a simple Node.JS application! No build step, no webpack, no npm run serve, no nonsense; Node programs ‘just work’.
Node “CommonJS” Modules
In the client, you have been writing ECMAScript 6 modules, which look like this:
// In './test_module.js':

export function Foo() {
  console.log("I'm Foo!");
}

// In './test_default_module.js':

export default function Bar() {
  console.log("I'm Bar!");
}

// In './test_importer.js':

// Import 'Foo' from './test_module.js'.
import {Foo} from './test_module';
// Import the default export of './test_default_module.js'.
import Bar from './test_default_module';

Foo(); // prints 'I'm Foo!'
Bar(); // prints 'I'm Bar!'
Node.JS came about before ECMAScript 6 modules, so it has its own module system called CommonJS. In CommonJS, a module has a magic object called module.exports. Anything you assign to this object gets “exported” on that module.
The above would be translated into CommonJS like so:
// In './test_module.js':

function Foo() {
  console.log("I'm Foo!");
}
// Export Foo as Foo.
module.exports.Foo = Foo;

// In './test_default_module.js':

function Bar() {
  console.log("I'm Bar!");
}
// A CommonJS "default" export merely overwrites the entire
// module.exports object.
//
// Unlike ECMAScript 6 modules, you cannot have default and
// non-default exports in the same module. `module.exports`
// is simply a JavaScript object.
module.exports = Bar;

// In './test_importer.js':

// Import 'Foo'
var TestModule = require('./test_module');
var Foo = TestModule.Foo;
// Import the default export of './test_default_module.js' module.
var Bar = require('./test_default_module');

Foo(); // prints 'I'm Foo!'
Bar(); // prints 'I'm Bar!'
Feel free to try out the above in the server folder. You don’t have to do this, but we recommend it.
If you create the three files, you can run them like this:
$ node src/test_importer.js
I'm Foo!
I'm Bar!
Writing and Debugging a Program
Let’s expand our helloworld.js program a bit. Let’s make it print out
'Hello World!' backwards! (You will have to do this part.)
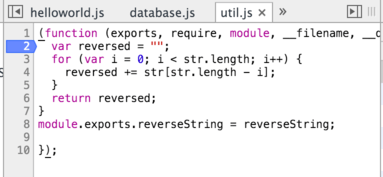
Let’s write a routine in src/util.js that reverses the string. Create src/util.js, and include the following code to reverse the string:
function reverseString(str) {
  var reversed = "";
  for (var i = 0; i < str.length; i++) {
    reversed += str[str.length - i];
  }
  return reversed;
}
module.exports.reverseString = reverseString;
Now, to test your knowledge: Using what you just learned about CommonJS modules, import reverseString into src/helloworld.js, and apply it to "Hello World!". Then, console.log the result.
Your program should print the following:
$ node src/helloworld.js
undefined!dlroW olle
Uh oh! There’s a bug in our reverseString code! How can we debug this program?
Enter Node Inspector! Simply run the program with node-debug instead:
$ node-debug src/helloworld.js
Node Inspector is now available from http://127.0.0.1:8080/?ws=127.0.0.1:8080&port=5858
Debugging `src/helloworld.js`

Debugger listening on port 5858
node-debug should open up Google Chrome automatically after a brief pause. Sometimes, though, it does not do this – especially on Mac :( . If it does not open Chrome, manually open Google Chrome, and go to the URL it printed to the terminal.
It will take a short bit before the interface pops up properly. Eventually, you’ll see the following:
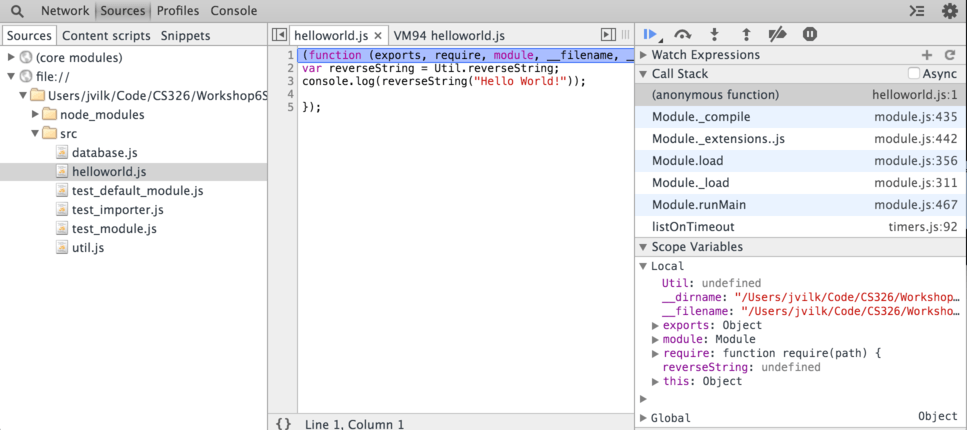
Node Inspector has created a breakpoint on your program’s first line, and so your program is paused at the first line of helloworld.js. Notice that your program looks a little different; it’s wrapped in a function(). Node Inspector is showing you a bit of Node.JS’s internal details; you can disregard this difference, as it doesn’t impact how the program runs!
Node Inspector’s interface should look familiar: It uses a version of Chrome’s Developer Tools that is modified to work with Node.JS.
Click on util.js in the Sources pane, and click on line number 2 to place a breakpoint on var reversed = ""; (it will be a blue mark):
This will cause the program to pause when it runs reverseString().
Then, click the “Resume Script Execution” button (which looks like a ‘Play’ button) to tell the program to resume running. It should immediately pause on your new breakpoint:
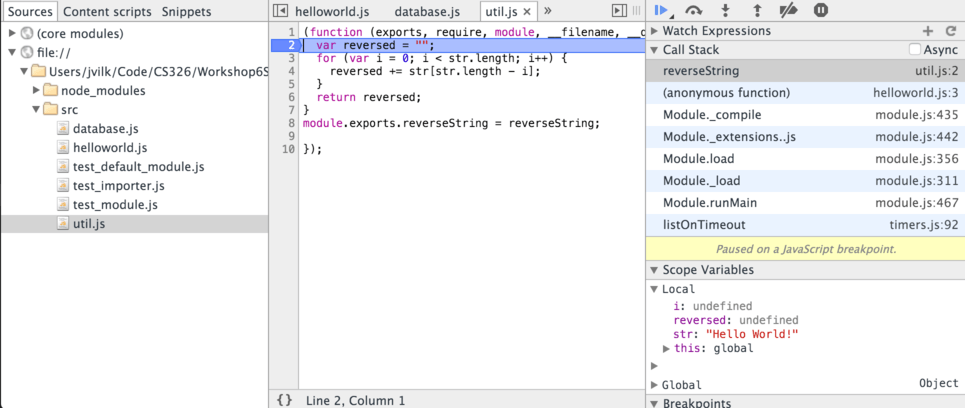
Before proceeding, let’s look at some of the stuff in the right pane of Node Inspector. This is where Node Inspector / Chrome’s Development Tools shows your program’s current state:
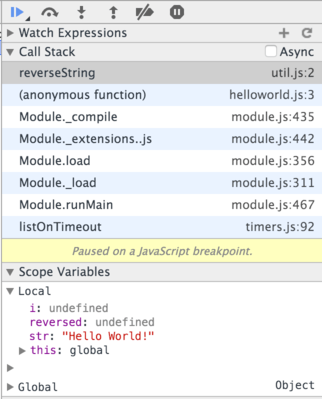
Call Stack: Displays the Call Stack of your paused program. In other words, it displays the trail of functions that called this function, along with their source location. If you click on any, Node-Inspector will take you to the line of the function that triggered the next in the stack.
You may notice some weird stuff in this call stack. timers.js and module.js are internal to Node.JS; once again, Node Inspector is showing you some of the “guts” of Node.JS. The real stuff starts above those stack frames, at helloworld.js.
Scope Variables: Displays all of the variables in the scope of the currently selected stack frame. If you click on reverseString in “Call Stack”, it will contain the state of the reversed variable, the i variable, the str argument to reverseString(), and this – which points to the Global Scope. reversed and i are undefined, since the function hasn’t assigned any values to them yet.
If you click on “(anonymous function) helloworld.js” in “Call Stack”, “Scope Variables” will update to show you the variables within helloworld.js – including the imported modules!
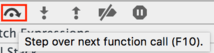
Now, click on “Step Over” once, which is to the right of the resume button. This will cause the program to run the currently selected line (reversed = ""), and pause at the next line (the for loop).
If you click on reverseString in “Call Stack” and look at “Stack Variables”, you’ll see that reversed is now set to "". Great!
Watch reversed, and click on “Step Over” until you see it change to "undefined" – which is literally a string with the text “undefined”. This happens after the first iteration of the loop. That’s not right!
Take a screenshot of node-inspector that clearly shows reversed set to the string “undefined”. Place it in your repository at server/node_inspector_undefined.png.
Now, why did this happen? If you look at the other state, i is 0. We appended str[str.length - i] to reversed. Why was this undefined?
Make sure reverseString is still selected in “Call Stack”, and click on the “Show Drawer” button in the upper-right corner to show the console (if it’s not already there!):

Note: When it turns blue like the screenshot, the console is open.
In the console, you can write JavaScript expressions that use the variables in the currently selected function in “Call Stack”! If you type reversed and hit enter, it will print the value of reversed:
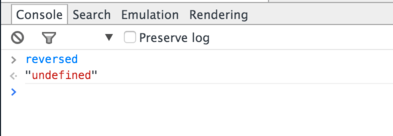
Type str[str.length - i] into the console, and hit “Enter”…. and you’ll discover the problem. Since i is 0, we accessed str[str.length]. Since strings are 0-indexed, you access the first character at index 0, second at index 1, etc. Thus, the last index of a string is actually at str.length - 1.
Change util.js to fix this bug so that your program works propely:
$ node src/helloworld.js
!dlroW olleH
add server/src/util.js server/src/helloworld.js server/node_inspector_undefined.png to the repository, commit them with message node, and push the commit to GitHub.
Express Introduction
Express is a Node.JS module that makes it easy to write web servers. You installed it when you ran npm install in the server directory.
Express has really good documentation. There are many Guides under the “Guide” section on that page, a full API reference in the “API” section (we’ll be using version 4 in this class), and more!
Hello World!
Create the file src/server.js with the following code:
// Imports the express Node module.
var express = require('express');
// Creates an Express server.
var app = express();

// Defines what happens when it receives the `GET /` request
app.get('/', function (req, res) {
  res.send('Hello World!');
});

// Starts the server on port 3000!
app.listen(3000, function () {
  console.log('Example app listening on port 3000!');
});
Run the server in the terminal:
$ node src/server.js
Example app listening on port 3000!
Open up your webbrowser to http://localhost:3000/, and you’ll be greeted to “Hello World!”.
Send HTTP Requests with Postman
With your example server still running, open up Postman. If you installed it as a Chrome App, open up Chrome to chrome://apps and click on Postman. If you installed it as a standalone application, it’s likely in the same place you find the rest of your programs on your operating system.
Postman may ask you to sign in or make an account, but you don’t have to create an account to use Postman; there is a link to continue to the application at the bottom of the sign-in page you can click instead.
Postman may look a little intimidating at first, but its core functionality is in a simple form at the center:

Type http://localhost:3000 into the “Request URL” box, keep the verb at GET, and click “Send”. Postman will display the response below your request:

If you click on “Headers”, you can see all of the metadata that your Express server sent along with the response. You can also see the response code in the upper right corner (in blue, next to “Status”).
You don’t need to memorize any of these details, but I’ll explain each part of the header anyway:
- Connection: keep-alive
- In ye olden days, every HTTP request was sent on an independent TCP socket, which isn’t very efficient. Modern servers, like Express, let clients keep a single socket open to send and receive multiple HTTP requests and responses over a single TCP socket.
- Content-Length: 12
- The body of the response is 12 bytes long. “Hello World!” is 12 characters long, with every character a single byte long.
- Content-Type: text/html; charset=utf-8
- Translation: The body of the response is either text or HTML, and it uses UTF-8 encoding. (remember how we discussed UTF-8/character encoding briefly in the HTML workshop? No? Then don’t worry too much; just know that UTF-8 is typically the right choice.)
- This is called the Media Type, or MIME type, of the response. It tells the client how to interpret the body.
- Date: (Contains a date and time)
- The time and date that the server sent the response.
- ETag: W/”c-7Qdih1MuhjZehB6Sv8UNjA”
- Used by web caches. Typically, if two responses contain the same etag, then they are identical.
- You can get the etag of a response without the response itself using the
HEADverb (go ahead, try it in Postman!) Notice how it doesn’t change across requests – since your response is always “Hello World!”. - Thought experiment: Imagine if the response was multiple megabytes in size – e.g. an MP3 file. Now imagine you are implementing a web cache for the CS department (we have one!), and 100 students in the CS department are trying to download this MP3 file. Can you imagine how you might use the etag and
HEADto check if it’s valid to serve a cached version of the MP3, saving the department $$ on internet costs?
- X-Powered-By: Express
- Contains what server/application sent the response. Completely meaningless, really, but most HTTP responses contain it.
By the way, if you want to see something funny, try running GET on http://reddit.com/ in Postman, and check the “Headers” field for x-moose. Since you can include arbitrary data in the Headers section, web developers sometimes include fun easter eggs.
If you try to send a request to your Express server for a route that you haven’t configured, like PUT http://localhost:3000/, you’ll receive a “404 Not Found”.
Let’s POST stuff!
Now that we have a simple Express application, let’s write a POST resource at /reverse that reverses the contents of whatever you POST to it!
In src/server.js, import reverseString from util.js (remember to import it the CommonJS way!). Then, add the following code:
// Handle POST /reverse [data]
app.post('/reverse', function (req, res) {
  // How do we get the input text?
  // How do we send the output text?
});
The two input arguments to the function above, req and res, refer to the HTTP request and the HTTP response. Express has detailed documentation for both the Request and the Response objects.
We need to get the body of the HTTP request, which will be a string to reverse. The documentation for req.body states we need additional software to handle the body:
Contains key-value pairs of data submitted in the request body. By default, it is
undefined, and is populated when you use body-parsing middleware such asbody-parserandmulter.
The body of a request or a response can contain arbitrary data. While you will typically use text or JSON in this class, the body can also contain a JPEG photo, a movie, a CSV file, or anything else you want. Thus, you may want req.body to be handled differently depending on what the data is.
Express has no opinion regarding how you should handle body, and lets you choose what middleware to use. For this workshop, we will use the body-parser library; you’ll likely want to use it in your startup projects, too!
Like with Express, you already installed body-parser when you ran npm install earlier. Import body-parser into server.js with the following code:
var bodyParser = require('body-parser');
Now, tell your app to use body-parser’s text middleware, which handles requests that self-identify as text (using the Content-Type field in the HTTP Request’s Header, which contains a Media type):
app.use(bodyParser.text());
Now, you can complete your POST function!
// Handle POST /reverse [data]
app.post('/reverse', function (req, res) {
  // If the request came with text, then the text() middleware handled it
  // and made `req.body` a string.
  // Check that req.body is a string.
  if (typeof(req.body) === 'string') {
    var reversed = reverseString(req.body);
    res.send(reversed);
  } else {
    // POST did not contain a string. Send an error code back!
  }
});
The code above raises a question: How do we send an HTTP error status code back? res.status(statuscode) is the answer. As for the status code to use… we should use 400: Bad Request as the status code, which Wikipedia describes as:
400 Bad Request
The server cannot or will not process the request due to an apparent client error (e.g., malformed request syntax, invalid request message framing, or deceptive request routing)
In this case, the request syntax is malformed, as it does not contain a string in the body. Add res.status(400).end() to the else branch above.
Open up the terminal you’ve been using to run your server. If it’s still running from earlier, kill it with CTRL+C, and re-run it so it pulls in the edits we just made. Node will not pull in code changes automatically into a running server; you always need to kill and re-run the server when you change its code.
Open up Postman, and tell it to POST http://localhost:3000/reverse with some text. You can edit the Body of the response by clicking on the “Body” section just below the URL entry box:

With “body” selected, click on “raw” to tell Postman that you’re editing the raw contents of the body (it defaults to form-data, which auto-formats the body like an oldschool HTML form submission). Enter a string, then hit SEND.
You should see a response from the server with the reversed string. Hurray! If you don’t enter a string (e.g. a blank body), you should receive a “400 Bad Request”.
Take a screenshot of Postman that shows your request and the server’s response, and include it as server/postman_screenshot.png.
add server/src/server.js and server/postman_screenshot.png to the repository, commit with message express, and push it to GitHub.
You’re ready to start writing Facebook’s server!
Writing a Server for Facebook
Note: If you skipped the previous sections, you’re doing this workshop incorrectly; by now, you should have made two commits that we will grade you on, and should have recorded an answer somewhere to two sets of questions. :)
From the previous sections, we know:
- How to write webservers using Express
- What HTTP routes we need to define for Facebook, and what verbs they need to support
- How to debug the server using Node Inspector
- How to test the server’s routes using Postman
You are totally ready to work on Facebook’s server!
Setup
Open up a terminal to the git repository folder for this workshop, and run the following commands:
$ cd client
$ npm install
$ npm run watch
Note that the last command is different from before it uses watch, not serve!
npm run serve rebuilds your code as it changes, and creates a dumb webserver that serves up the files in build/. Your Express server in server will take the place of this dumb webserver, so we no longer need it. npm run watch will only rebuild your code as it changes.
Keep this terminal open and running throughout the rest of the workshop.
Note: If you still have a terminal open running npm run serve from earlier, you can close it / kill the server. We no longer need it.
Serve up HTML, CSS, and JavaScript
Our webserver needs to serve our HTML, CSS, JavaScript, and image files from client/build. Otherwise, a web browser will not be able to load our webpage!
Express has handy APIs for serving up static files from the file system.
Simply add the followling line to src/server.js:
// You run the server from `server`, so `../client/build` is `server/../client/build`.
// '..' means "go up one directory", so this translates into `client/build`!
app.use(express.static('../client/build'));
Remove the two routes we defined previously for / and /reverse, as we no longer need them. Then, open up a terminal to the server folder in the git repository folder, and run the server with node src/server.js. If you open your web browser to http://localhost:3000/, you’ll see the Facebook mockup!
commit this change with message static, and push it to GitHub.
Migrate Data to Mock Database on Server
The first step is simple: Copy+paste the objects from initialData in client/app/database.js to initialData in server/src/database.js. (Don’t simply overwrite the entire database.js file; the rest of the Node.js database.js is slightly different!)
Now, your database is all set for the server!
NOTE: Due to an oversight, the Workshop 6 repository already contains this change. Instead of doing the copy+paste, simply add a new line to server/src/database.js to indicate that you read this section, and commit that as your change.
commit this change with message database, and push it to GitHub.
Implement a single route on the server
Let’s migrate the getFeedData function from the client to the server. Literally copy the functions getFeedData and getFeedItemSync from the client’s server.js, and paste them into the server’s server.js. Change getFeedData so it simply returns the resolved FeedData object; there’s no need to emulate a server return anymore, as all of this code is running on the server!
You will also need to import the database function readDocument. Remember to use CommonJS syntax!
/**
 * Resolves a feed item. Internal to the server, since it's synchronous.
 */
function getFeedItemSync(feedItemId) {
  var feedItem = readDocument('feedItems', feedItemId);
  // Resolve 'like' counter.
  feedItem.likeCounter = feedItem.likeCounter.map((id) =>
                            readDocument('users', id));
  // Assuming a StatusUpdate. If we had other types of
  // FeedItems in the DB, we would
  // need to check the type and have logic for each type.
  feedItem.contents.author = readDocument('users',
	                                      feedItem.contents.author);
  // Resolve comment author.
  feedItem.comments.forEach((comment) => {
    comment.author = readDocument('users', comment.author);
  });
  return feedItem;
}

/**
 * Get the feed data for a particular user.
 */
function getFeedData(user) {
  var userData = readDocument('users', user);
  var feedData = readDocument('feeds', userData.feed);
  // While map takes a callback, it is synchronous,
  // not asynchronous. It calls the callback immediately.
  feedData.contents = feedData.contents.map(getFeedItemSync);
  // Return FeedData with resolved references.
  return feedData;
}
Now, we can define a route that gets the feed data. Recall that we decided that this function would map to GET /user/:userid/feed. Express supports URL parameters in a similar way as React Router, using a colon (:) to indicate variables in the URL:
/**
 * Get the feed data for a particular user.
 */
app.get('/user/:userid/feed', function(req, res) {
  // URL parameters are stored in req.params
  var userid = req.params.userid;
  // Send response.
  res.send(getFeedData(userid));
});
Re-run your server, and run GET http://localhost:3000/user/4/feed in Postman. You should see a JSON object with the feed data. Awesome!
Our web server should only respond with a user’s feed item if that user is requesting it. In other words, user Bob shouldn’t be able to see user Sarah’s Facebook feed!
As mentioned previously, we will eventually use legitimate JSON web tokens for authentication, which uses encryption to verify the token’s authenticity. For now, though, we’ll simply blindly trust unencrypted tokens that the client gives us, and use those to check permissions.
JSON web tokens (and other types of tokens!) are sent in the Authorization field in the HTTP Request’s Header, with the value:
Authorization: Bearer <token>
To make a token out of a JSON object, we’ll simply stringify the JSON object and use base 64 encoding to turn it into a string we can put into the header. You don’t need to know much about base64; just know that it’s a convenient way to turn arbitrary data into a string that only contains letters and numbers.
Example: The JavaScript object {foo: 3} gets turned into the JSON string '{"foo": 3}', and conversion to base64 changes it into a string with only letters and numbers (and, sometimes, the equals sign = at the end).
We can use
req.get('Authorization') to retrieve the “Authorization” header field, use NodeJS’s Buffer API to translate the base64 string into a regular string, and then use JSON.parse() to turn the string into a JavaScript object. Should any of this fail, the user is not authorized.
Modify src/server.js with the following code:
/**
 * Get the user ID from a token. Returns -1 (an invalid ID)
 * if it fails.
 */
function getUserIdFromToken(authorizationLine) {
  try {
    // Cut off "Bearer " from the header value.
    var token = authorizationLine.slice(7);
    // Convert the base64 string to a UTF-8 string.
    var regularString = new Buffer(token, 'base64').toString('utf8');
    // Convert the UTF-8 string into a JavaScript object.
    var tokenObj = JSON.parse(regularString);
    var id = tokenObj['id'];
    // Check that id is a number.
    if (typeof id === 'number') {
      return id;
    } else {
      // Not a number. Return -1, an invalid ID.
      return -1;
    }
  } catch (e) {
    // Return an invalid ID.
    return -1;
  }
}

/**
 * Get the feed data for a particular user.
 */
app.get('/user/:userid/feed', function(req, res) {
  var userid = req.params.userid;
  var fromUser = getUserIdFromToken(req.get('Authorization'));
  // userid is a string. We need it to be a number.
  // Parameters are always strings.
  var useridNumber = parseInt(userid, 10);
  if (fromUser === useridNumber) {
    // Send response.
    res.send(getFeedData(userid));
  } else {
    // 401: Unauthorized request.
    res.status(401).end();
  }
});
After making these changes, re-run the server. Try to GET /user/4/feed in Postman; you will get a “401 Unauthorized”. In another terminal, run node (no arguments) to open up the Node REPL. A REPL lets you type code, which immediately runs and prints a response. The console in Chrome’s Web Development Tools is a REPL; when you used Node Inspector to debug a program earlier, you typed in lines of code and it printed the result!
Type the following into the REPL, and hit Enter to generate a token for user 4:
new Buffer(JSON.stringify({ id: 4 })).toString('base64');
This one-liner will:
- Convert the JavaScript object
{ id: 4 }to a JSON string. - Place that JSON string into a NodeJS Buffer object.
- Convert the Buffer into base64 encoding.
In Postman, click on the “Headers” tab for your request. Add a header for “Authorization” with the value “Bearer [token here]” – for example, “Bearer ubBbsf4==” – using the token that you just received on the command line. Then, click Send. It should give you back the feed for user 4!
commit this change with message getFeedData, and push it to GitHub
Communicating with the Server from the Client
Now that we have server support for getFeedData, we will modify the client to use this new server method. Web browsers have an API called XMLHttpRequest that facilitates communicating with web servers like this.
Aside: XMLHttpRequest is a weird name for this API. The name is a remnant of the bad old days, when Internet Explorer implemented the interface as a way for Outlook Web Access to fetch XML documents using HTTP requests. Others discovered it, Firefox implemented it, and now it’s used to perform any type of HTTP request… but the confusing name remains!
Let’s walk through using it to send a request to /user/4/feed!
First, create an XMLHttpRequest object:
var xhr = new XMLHttpRequest();
Then, call open()
on the object with the HTTP verb and target URL.
xhr.open('GET', '/user/4/feed');
Next, use setRequestHeader to set ‘Authorized’ to the base64 token you generated:
xhr.setRequestHeader('Authorization', 'Bearer jsontokenhere');
Next, attach an event listener, which will fire when the server sends a response to our request. At that time, the response body will be available on the responseText property of the XMLHttpRequest object:
xhr.addEventListener('load', function() {
  // Call the callback with the data.
  cb(JSON.parse(xhr.responseText));
});
Finally, use send() to send the request over the network!
xhr.send();
Put it all together, and use it to replace getFeedData in app/server.js. Make sure you still have npm run watch running in the client folder, and navigate your web browser to http://localhost:3000/. Facebook should still work as before.
How do you know that it’s working, though? If you open up Chrome Devtools, click on the ‘Network’ tab, and refresh the page, you should see feed in the entry of the list of Network Requests:
If you do not see feed there, Chrome may be using a cached version of your Facebook mockup. Check the “Disable cache” checkbox on the network tab, and reload the page. That should fix the issue. Note that the “Disable cache” option is only active when you have Chrome’s development tools open.
commit your changes with message facebookGotServed and push it to GitHub.
Handling HTTP Requests That Fail
The above code works great when a request succeeds, but it does not handle scenarios where a request fails. There are three primary types of failures: Network failures, client errors, and server errors.
Network Failures: The client cannot reach the server, at all. The request will time out, with no response from the server. Some plausible reasons include…
- The server chose not to respond, or did not respond due to developer error. If you write an Express route that never calls
res.send(), then the client will never receive a response. - The client is not connected to the internet. On a laptop, this happens frequently when closing the laptop and re-opening it again later. On a phone, this can happen when moving between WiFi and your cell carrier’s wireless data network… or moving between two WiFi hotspots.
- The server is down. Maybe you had to take the server down for maintainence?
- There’s a network problem between the client and server. There’s a lot going on on the internet, and sometimes the route between the client and the server gets congested or goes down. Heck, in San Francisco, some group has cut 16 fiber optic cables in the past year. Things happen.
- The server is malfunctioning or overloaded. Ever see the Twitter fail whale? This would happen when Twiters services were either overloaded or malfunctioning; they simply could not send HTTP responses in a timely fashion.
Client errors: The server responded, but denied the request. The Status Code will be in the 400-499 range. The previous link includes a list of status codes, which covers reasons why a request may not be granted. All client errors are the result of an invalid client request (e.g. a request that is not authorized, or the request involves a resource that does not exist).
Server errors: The server responded, but claims that it is unable to service the request. There is nothing wrong with the client’s request; the server is having a problem, and is unable to respond to it. The Status Code will be in the 500-599 range. Error code 500, “Internal Server Error”, is the error you will most likely see.
In this class, your server should send a 500 to the client when:
- Your server’s JavaScript has an error. Express automatically responds with
500if your code throws an uncaught exception. We haven’t talked much about JavaScript exceptions, but you’ve likely seen them in the Chrome Web Developer console in red. - The database is not responding / not running. We’re using a mock database that’s embedded with the server right now, but we will later switch to MongoDB. If your database is not responding to requests, or is responding with an error, you should send a
500to the client. - Requests to an external service your server is interacting with is failing. If your startup project’s server interacts with another service, and that service fails, you should send a
500to the client.
Learning how to catch these errors and report them will be good for your user, and will be good for you as a developer – otherwise, you may never see the failure at all!
The bare minimum amount of error handling we should do is surface the error so the user knows that something has gone wrong. Let’s add code to the client to display these failures. We will add a Bootstrap “Warning” alert above Facebook’s three-column layout to display any server issues. We will tell the user to try reloading the webpage. We will also install a global function, callable from anywhere, that lets code display information in this alert box.
In the client, add app/components/errorbanner.js with the following code:
Note: Due to an oversight, your workshop 6 repository already contains this file. You do not need to change it.
import React from 'react';
import {hideElement} from '../util';

/**
 * A yellow error banner that uses Bootstrap's "warning" alert.
 * Used to display HTTP request failures.
 */
export default class ErrorBanner extends React.Component {
  constructor(props) {
    super(props);
    this.state = {
      active: false,
      errors: ""
    };

    // ASSUMPTION: There is only one ErrorBanner component ever created.
    // (Otherwise, each will overwrite one another's global function...)
    // By assigning to 'window', this is a global function. Global functions
    // are not typically a good idea, but they can be useful for adding basic
    // error handling to an application
    window.FacebookError = (errorText) => {
      this.setState({
        active: true,
        error: errorText
      })
    };
  }

  render() {
    // Don't display the error banner unless 'this.state.active' is true.
    return (
      <div className={"alert alert-warning " + hideElement(!this.state.active)}
		   role="alert">
        Facebook was unable to complete a recent
		request: {this.state.error}<br />
        Please <a onClick={() => window.location.reload()}>
		refresh the web page</a> and try again.
      </div>
    );
  }
}
In app/app.js, add code that imports ErrorBanner from './components/errorbanner', and then change the render() function of App to render an error banner:
  render() {
    // If there's no query input to this page (e.g. /foo instead of /foo?bar=4),
    // query may be undefined. We have to check for this, otherwise
    // JavaScript will throw an exception and die!
    var queryVars = this.props.location.query;
    var searchTerm = null;
    if (queryVars && queryVars.searchTerm) {
      searchTerm = queryVars.searchTerm;
    }
    return (
      <div>
        <NavBar searchTerm={searchTerm} />
        <div className="container">
          <div className="row">
            <div className="col-md-12">
              <ErrorBanner />
            </div>
          </div>
          <div className="row">
            <div className="col-md-2 fb-left-sidebar">
              <LeftSideBar />
            </div>
            <div className="col-md-7">
              {this.props.children}
            </div>
            <div className="col-md-3 fb-right-sidebar">
              <RightSideBar />
            </div>
          </div>
        </div>
        <ChatPopup />
      </div>
    )
  }
Finally, in server.js, we’ll introduce a helper function that sets up an XHR request, and appropriately displays errors when they happen. Make sure you put your token from earlier into the code!
var token = ''; // <-- Put your base64'd JSON token here
/**
 * Properly configure+send an XMLHttpRequest with error handling,
 * authorization token, and other needed properties.
 */
function sendXHR(verb, resource, body, cb) {
  var xhr = new XMLHttpRequest();
  xhr.open(verb, resource);
  xhr.setRequestHeader('Authorization', 'Bearer ' + token);

  // The below comment tells ESLint that FacebookError is a global.
  // Otherwise, ESLint would complain about it! (See what happens in Atom if
  // you remove the comment...)
  /* global FacebookError */

  // Response received from server. It could be a failure, though!
  xhr.addEventListener('load', function() {
    var statusCode = xhr.status;
    var statusText = xhr.statusText;
    if (statusCode >= 200 && statusCode < 300) {
      // Success: Status code is in the [200, 300) range.
      // Call the callback with the final XHR object.
      cb(xhr);
    } else {
      // Client or server error.
      // The server may have included some response text with details concerning
      // the error.
      var responseText = xhr.responseText;
      FacebookError('Could not ' + verb + " " + resource + ": Received " +
		            statusCode + " " + statusText + ": " + responseText);
    }
  });

  // Time out the request if it takes longer than 10,000
  // milliseconds (10 seconds)
  xhr.timeout = 10000;

  // Network failure: Could not connect to server.
  xhr.addEventListener('error', function() {
    FacebookError('Could not ' + verb + " " + resource +
	              ": Could not connect to the server.");
  });

  // Network failure: request took too long to complete.
  xhr.addEventListener('timeout', function() {
    FacebookError('Could not ' + verb + " " + resource +
		          ": Request timed out.");
  });

  switch (typeof(body)) {
    case 'undefined':
      // No body to send.
      xhr.send();
      break;
    case 'string':
      // Tell the server we are sending text.
      xhr.setRequestHeader("Content-Type", "text/plain;charset=UTF-8");
      xhr.send(body);
      break;
    case 'object':
      // Tell the server we are sending JSON.
      xhr.setRequestHeader("Content-Type", "application/json;charset=UTF-8");
      // Convert body into a JSON string.
      xhr.send(JSON.stringify(body));
      break;
    default:
      throw new Error('Unknown body type: ' + typeof(body));
  }
}
Now, change getFeedData to use this function:
/**
 * Emulates a REST call to get the feed data for a particular user.
 */
export function getFeedData(user, cb) {
  // We don't need to send a body, so pass in 'undefined' for the body.
  sendXHR('GET', '/user/4/feed', undefined, (xhr) => {
    // Call the callback with the data.
    cb(JSON.parse(xhr.responseText));
  });
}
Now that you’ve made these changes, you should test that it all works. Induce one of the error conditions above and take a screenshot of Facebook with ErrorBanner displayed.
How can you induce an error? Here are some suggestions:
- For the timeout, remove the call to
res.send()from the server that sends Feed data to the client. It will take 10 seconds for the timeout to occur. - For the network failure, load Facebook, shut down the web server, and then try to delete a Facebook post. (Deleting a Facebook post will cause the Feed to
refresh(), which will fail.) - For the client or server error, change the server to send a status code in the 400 or 500 range to the client instead of the Feed data. Or, change your JSON token to something invalid.
Remember to restart the server if you make any modifications to it, and to remove those modifications once you have taken a screenshot!
add the screenshot to your repository as server/facebook_fail.png, commit your changes as failbook, and push the commit to GitHub.
Our warning message is not too user friendly, though. Can you imagine what your granddad would think after seeing such an error? Good error handling is hard, and constitutes a large portion of a web developer’s work. We will not hold your startups to high standards with regard to error handling, but you may have creative ideas regarding how you may decide to handle them in your own projects!
postStatusUpdate, and Validating Data with JSON Schema
postStatusUpdate is the first Express function you will write that accepts complex data from the client.
If there’s anything you take away from this workshop, it should be this: Server requests can contain anything, and can come from anywhere. If a request has a valid JSON Web Token, that only means that the request is coming from an authenticated user (or someone/something who has stolen an authenticated user’s token – called a session hijacking attack). The authenticated user could still issue malformed requests manually using a tool like Postman. (Or your client could simply have a bug, and be sending garbage data.)
You should be paranoid about the data your server processes. Is it a JSON object, like you expected? Does it have all of the fields you expect? Are the fields the correct type – e.g. a number for userId, a string for content, etc?
It sounds onerous to check all of these things… and it is! Thankfully, you can easily write or generate JSON Schema to check request bodies against, and use express-jsonschema middleware to automate this checking.
A JSON schema merely describes the format of a JSON object. Recall that we decided to use the following HTTP request for posting a status update:
POST /feeditem { userId: user, location: location, contents: contents }
The body contains a JSON object with the following fields:
userId: A number with the user ID.location: A string containing the user’s location.contents: A string containing the status update text.
All of these fields are required.
A JSON schema for this data structure would look like the following. (As you may notice, a JSON schema is a JSON object… which means there is a JSON schema for JSON schemas):
{
  "$schema": "http://json-schema.org/draft-04/schema#",
  "id": "/",
  "type": "object",
  "properties": {
    "userId": {
      "id": "userId",
      "type": "integer"
    },
    "location": {
      "id": "location",
      "type": "string"
    },
    "contents": {
      "id": "contents",
      "type": "string"
    }
  },
  "additionalProperties": false,
  "required": [
    "userId",
    "location",
    "contents"
  ]
}
The "required" list lists all of the properties that must be present on the object for it to be valid, and identifies the properties using their "id" property.
You can automatically generate the above schema at http://jsonschema.net/ using a simple example of an object. Untick ‘Use absolute IDs’ and “Allow additional properties”, and enter a sample StatusUpdate JSON object:
{
  "userId": 1,
  "location": "Amherst, MA",
  "contents": "are all of the animals in zootopia vegetarian?"
}
Clicking ‘Generate Schema’ will create the above schema. JSON schemas have other options, too, which you can explore using that generator.
In the server directory, create the folder src/schemas, and create the file src/schemas/statusupdate.json. Paste the JSON schema from above into it.
In src/server.js, Node.JS lets you import the JSON like you would a module:
var StatusUpdateSchema = require('./schemas/statusupdate.json');
Now, we can pass this JSON object to the express-jsonschema validator, and use it in the route for POST /feeditem! Import the express-jsonschema validate function into src/server.js, and also import database’s writeDocument and addDocument:
var validate = require('express-jsonschema').validate;
var writeDocument = database.writeDocument;
var addDocument = database.addDocument;
Also, add a bodyParser for JSON alongsize the existing body parser for text:
// Support receiving text in HTTP request bodies
app.use(bodyParser.text());
// Support receiving JSON in HTTP request bodies
app.use(bodyParser.json());
Now, add the /feeditem POST like so:
/**
 * Adds a new status update to the database.
 */
function postStatusUpdate(user, location, contents) {
  // If we were implementing this for real on an actual server, we would check
  // that the user ID is correct & matches the authenticated user. But since
  // we're mocking it, we can be less strict.

  // Get the current UNIX time.
  var time = new Date().getTime();
  // The new status update. The database will assign the ID for us.
  var newStatusUpdate = {
    "likeCounter": [],
    "type": "statusUpdate",
    "contents": {
      "author": user,
      "postDate": time,
      "location": location,
      "contents": contents,
      "likeCounter": []
    },
    // List of comments on the post
    "comments": []
  };

  // Add the status update to the database.
  // Returns the status update w/ an ID assigned.
  newStatusUpdate = addDocument('feedItems', newStatusUpdate);

  // Add the status update reference to the front of the current user's feed.
  var userData = readDocument('users', user);
  var feedData = readDocument('feeds', userData.feed);
  feedData.contents.unshift(newStatusUpdate._id);

  // Update the feed object.
  writeDocument('feeds', feedData);

  // Return the newly-posted object.
  return newStatusUpdate;
}

// `POST /feeditem { userId: user, location: location, contents: contents  }`
app.post('/feeditem',
         validate({ body: StatusUpdateSchema }), function(req, res) {
  // If this function runs, `req.body` passed JSON validation!
  var body = req.body;
  var fromUser = getUserIdFromToken(req.get('Authorization'));

  // Check if requester is authorized to post this status update.
  // (The requester must be the author of the update.)
  if (fromUser === body.userId) {
    var newUpdate = postStatusUpdate(body.userId, body.location,
		                             body.contents);
    // When POST creates a new resource, we should tell the client about it
    // in the 'Location' header and use status code 201.
    res.status(201);
    res.set('Location', '/feeditem/' + newUpdate._id);
     // Send the update!
    res.send(newUpdate);
  } else {
    // 401: Unauthorized.
    res.status(401).end();
  }
});
In client/app/server.js, simply change postStatusUpdate to use sendXHR:
/**
 * Adds a new status update to the database.
 */
export function postStatusUpdate(user, location, contents, cb) {
  sendXHR('POST', '/feeditem', {
    userId: user,
    location: location,
    contents: contents
  }, (xhr) => {
    // Return the new status update.
    cb(JSON.parse(xhr.responseText));
  });
}
If you restart the server and head to http://localhost:3000, you should be able to post status updates and have them continue to appear when you refresh the page! (Naturally, other features, like “liking” the update, will not work since we’re still using the client-side database.js for those features.)
Using Postman, send an invalid POST /feeditem to your server. Remember to set the Authorization header to “Bearer
Express lets us define custom functions that process errors. Let’s make one that processes “JsonSchemaValidation” errors, which are described in express-jsonschema’s README, and turns them into a response with status code 400, “Bad Request”:
/**
 * Translate JSON Schema Validation failures into error 400s.
 */
app.use(function(err, req, res, next) {
  if (err.name === 'JsonSchemaValidation') {
    // Set a bad request http response status
    res.status(400).end();
  } else {
    // It's some other sort of error; pass it to next error middleware handler
    next(err);
  }
});
Add this function to src/server.js at the end of the file, just above app.listen. It must come after all of our defined routes (e.g. app.get, app.post, etc.).
If you restart the server and submit another invalid request with Postman, you’ll get a status code 400: Bad Request. Perfect!
add src/schemas/statusupdate.json, commit your changes with message validation, and push your changes to GitHub.
Implement the Rest of the Routes
We are in the home stretch. We have the infrastructure to port over the rest of our methods in server.js, and you should now have the know-how to implement the comment-related routes on your own!
You’ll commit all of these changes at once, at the end of this section.
Reset Database
Wouldn’t it be nice if our “Reset DB” button reset the database on the server? That would be a useful development feature. Let’s add a /resetdb route that, when POSTed to, resets the database:
// Reset database.
app.post('/resetdb', function(req, res) {
  console.log("Resetting database...");
  // This is a debug route, so don't do any validation.
  database.resetDatabase();
  // res.send() sends an empty response with status code 200
  res.send();
});
Change the ResetDatabase component in client/app/database.js so that it POSTs to this route:
/**
 * Reset database button.
 */
export class ResetDatabase extends React.Component {
  render() {
    return (
      <button className="btn btn-default" type="button" onClick={() => {
        var xhr = new XMLHttpRequest();
        xhr.open('POST', '/resetdb');
        xhr.addEventListener('load', function() {
          window.alert("Database reset! Refreshing the page now...");
          document.location.reload(false);
        });
        xhr.send();
      }}>Reset Mock DB</button>
    );
  }
}
updateFeedItemText
We decided to map this route to PUT /feeditem/:feeditemid/content text.
Add the following route to server/src/server.js:
// Update a feed item.
app.put('/feeditem/:feeditemid/content', function(req, res) {
  var fromUser = getUserIdFromToken(req.get('Authorization'));
  var feedItemId = req.params.feeditemid;
  var feedItem = readDocument('feedItems', feedItemId);
  // Check that the requester is the author of this feed item.
  if (fromUser === feedItem.contents.author) {
    // Check that the body is a string, and not something like a JSON object.
    // We can't use JSON validation here, since the body is simply text!
    if (typeof(req.body) !== 'string') {
      // 400: Bad request.
      res.status(400).end();
      return;
    }
    // Update text content of update.
    feedItem.contents.contents = req.body;
    writeDocument('feedItems', feedItem);
    res.send(getFeedItemSync(feedItemId));
  } else {
    // 401: Unauthorized.
    res.status(401).end();
  }
});
Then, change client/app/server.js to use this route:
/**
 * Updates the text in a feed item (assumes a status update)
 */
export function updateFeedItemText(feedItemId, newContent, cb) {
  sendXHR('PUT', '/feeditem/' + feedItemId + '/content', newContent, (xhr) => {
    cb(JSON.parse(xhr.responseText));
  });
}
deleteFeedItem
We decided to map this function to DELETE /feeditem/feeditemid.
Implement this route in server/src/server.js:
/**
 * Delete a feed item.
 */
app.delete('/feeditem/:feeditemid', function(req, res) {
  var fromUser = getUserIdFromToken(req.get('Authorization'));
  // Convert from a string into a number.
  var feedItemId = parseInt(req.params.feeditemid, 10);
  var feedItem = readDocument('feedItems', feedItemId);
  // Check that the author of the post is requesting the delete.
  if (feedItem.contents.author === fromUser) {
    database.deleteDocument('feedItems', feedItemId);
    // Remove references to this feed item from all other feeds.
    var feeds = database.getCollection('feeds');
    var feedIds = Object.keys(feeds);
    feedIds.forEach((feedId) => {
      var feed = feeds[feedId];
      var itemIdx = feed.contents.indexOf(feedItemId);
      if (itemIdx !== -1) {
        // Splice out of array.
        feed.contents.splice(itemIdx, 1);
        // Update feed.
        database.writeDocument('feeds', feed);
      }
    });
    // Send a blank response to indicate success.
    res.send();
  } else {
    // 401: Unauthorized.
    res.status(401).end();
  }
});
Then, change client/app/server.js to use it:
/**
 * Deletes a feed item.
 */
export function deleteFeedItem(feedItemId, cb) {
  sendXHR('DELETE', '/feeditem/' + feedItemId, undefined, () => {
    cb();
  });
}
likeFeedItem
We decided to map this function to PUT /feeditem/feeditemid/likelist/userid.
Implement this route in server/src/server.js:
// Like a feed item.
app.put('/feeditem/:feeditemid/likelist/:userid', function(req, res) {
  var fromUser = getUserIdFromToken(req.get('Authorization'));
  // Convert params from string to number.
  var feedItemId = parseInt(req.params.feeditemid, 10);
  var userId = parseInt(req.params.userid, 10);
  if (fromUser === userId) {
    var feedItem = readDocument('feedItems', feedItemId);
    // Add to likeCounter if not already present.
    if (feedItem.likeCounter.indexOf(userId) === -1) {
      feedItem.likeCounter.push(userId);
      writeDocument('feedItems', feedItem);
    }
    // Return a resolved version of the likeCounter
    res.send(feedItem.likeCounter.map((userId) =>
	                                  readDocument('users', userId)));
  } else {
    // 401: Unauthorized.
    res.status(401).end();
  }
});
Then, change client/app/server.js to use this route:
/**
 * Updates a feed item's likeCounter by adding the user to the likeCounter.
 * Provides an updated likeCounter in the response.
 */
export function likeFeedItem(feedItemId, userId, cb) {
  sendXHR('PUT', '/feeditem/' + feedItemId + '/likelist/' + userId,
          undefined, (xhr) => {
    cb(JSON.parse(xhr.responseText));
  });
}
unlikeFeedItem
We decided to map this function to DELETE /feeditem/feeditemid/likelist/userid.
Add this route to server/src/server.js:
// Unlike a feed item.
app.delete('/feeditem/:feeditemid/likelist/:userid', function(req, res) {
  var fromUser = getUserIdFromToken(req.get('Authorization'));
  // Convert params from string to number.
  var feedItemId = parseInt(req.params.feeditemid, 10);
  var userId = parseInt(req.params.userid, 10);
  if (fromUser === userId) {
    var feedItem = readDocument('feedItems', feedItemId);
    var likeIndex = feedItem.likeCounter.indexOf(userId);
    // Remove from likeCounter if present
    if (likeIndex !== -1) {
      feedItem.likeCounter.splice(likeIndex, 1);
      writeDocument('feedItems', feedItem);
    }
    // Return a resolved version of the likeCounter
    // Note that this request succeeds even if the
	// user already unliked the request!
    res.send(feedItem.likeCounter.map((userId) =>
		                                readDocument('users', userId)));
  } else {
    // 401: Unauthorized.
    res.status(401).end();
  }
});
Then, change client/app/server.js to use this route:
/**
 * Updates a feed item's likeCounter by removing the user
 * from the likeCounter. Provides an updated likeCounter
 * in the response.
 */
export function unlikeFeedItem(feedItemId, userId, cb) {
  sendXHR('DELETE', '/feeditem/' + feedItemId + '/likelist/' + userId,
	      undefined, (xhr) => {
    cb(JSON.parse(xhr.responseText));
  });
}
searchForFeeditems
We decided to map this route to POST /search searchtext.
Add this route to server/src/server.js:
// Search for feed item
app.post('/search', function(req, res) {
  var fromUser = getUserIdFromToken(req.get('Authorization'));
  var user = readDocument('users', fromUser);
  if (typeof(req.body) === 'string') {
    // trim() removes whitespace before and after the query.
    // toLowerCase() makes the query lowercase.
    var queryText = req.body.trim().toLowerCase();
    // Search the user's feed.
    var feedItemIDs = readDocument('feeds', user.feed).contents;
    // "filter" is like "map" in that it is a magic method for
    // arrays. It takes an anonymous function, which it calls
    // with each item in the array. If that function returns 'true',
    // it will include the item in a return array. Otherwise, it will
    // not.
    // Here, we use filter to return only feedItems that contain the
    // query text.
    // Since the array contains feed item IDs, we later map the filtered
    // IDs to actual feed item objects.
    res.send(feedItemIDs.filter((feedItemID) => {
      var feedItem = readDocument('feedItems', feedItemID);
      return feedItem.contents.contents
	                 .toLowerCase()
					 .indexOf(queryText) !== -1;
    }).map(getFeedItemSync));
  } else {
    // 400: Bad Request.
    res.status(400).end();
  }
});
Then, update client/app/server.js to use this route:
/**
 * Searches for feed items with the given text.
 */
export function searchForFeedItems(userID, queryText, cb) {
  // userID is not needed; it's included in the JSON web token.
  sendXHR('POST', '/search', queryText, (xhr) => {
    cb(JSON.parse(xhr.responseText));
  });
}
Commit Your Changes
If you rerun your server, you should now be able to do the following activities on Facebook:
- Post status updates
- Edit status updates you have authored
- Delete status updates
- Reset the server’s database
- Search for status updates
- Like status updates
- Unlike status updates
If something doesn’t work, it should surface on your Facebook page as an error. Maybe you pasted something incorrectly?
Once everything checks out and works, commit your changes with message almostDone, and push your changes to GitHub.
Add Comment Routes Yourself!
Previously, we asked you to think about what HTTP resources you should use for comments and their LikeList, and what HTTP requests to use for postComment, likeComment, and unlikeComment. Now, you must implement those HTTP requests using the knowledge you have learned in this workshop.
Specifically, you will need to do the following:
- Add a route to the server for
postComment,likeComment, andunlikeComment. - Update the functions in
client/app/server.jsto issue HTTP requests. - Create a JSON schema for comment data, and place it into
server/src/schemas/comment.json - Validate comment data input to
postCommentusing the JSON schema.
All of this is plainly described in the grading rubric, and we will test for all of these things!
Once you’re done, commit your changes with message missionAccomplished, and push your changes to GitHub.
Conclusion
You did it! You’ve written a server for Facebook.
Through this workshop, you’ve learned:
- What HTTP is, including what information is included in HTTP requests/responses
- How to map HTTP resources to database entities
- How to map mock server requests to HTTP requests
- What Node.JS is, and how to write Node.JS programs
- How to debug Node.JS programs
- What Express is, and how to write Express servers
- How to send arbitrary HTTP requests to Express servers using Postman
- How to validate data sent to servers using JSON schema
By now, you should have all of the knowledge required to add a server to your startup product!
Submission
You must submit the URL of your Workshop6 GitHub repository to Moodle. Visit Moodle, find the associated Workshop 9 activity, and provide your URL. Make sure your Workshop6 repository is public so we can clone your repository and evaluate your work. Submitting the URL for this assignment is part of completing the work.